Saturday, April 27, 2013

Summer Sides


 I love this time of year when we frequently fire up the grill and our meals get a little lighter and a little easier.  Yesterday afternoon my parents came over for supper... my mom and I usually split the duties, so she took the hamburgers and I took the sides. 

Roasted Sweet Potato "Fries"


I wanted to come up with something that resembled fries, but was healthy.  So I cut up some sweet potatoes to look like fries and roasted them.  I roast vegetables all year long, but my favorite time to roast them is in the summer when vegetables from the garden are plentiful (can't wait)... usually it consists of simply coating them in olive oil, but last night I added some maple syrup to give the sweet potatoes some sweetness... they were delicious!  

Preheat oven to 375 degrees.

Cut up 2-3 large sweet potatoes so that they resemble fries.

Whisk together 1/4 cup extra-virgin olive oil and 1/4 cup maple syrup and pour it over the cut sweet potatoes and mix so they are evenly coated.  

Lay a piece of parchment paper (makes for easy-cleanup) in a baking dish (I used a large glass Pyrex dish).  

Place the sweet potatoes in the dish and sprinkle with plenty of sea salt and freshly ground black pepper to taste.  Roast for 45 minutes.  

Fruit Salad


I don't know about you, but I start craving fruit this time of year... in green salads, by itself, mixed with other fruits, you name it.  This is almost too simple to share, but a hint of orange juice and local honey hit just the right note of sweet.

Chop and slice fruit (I used a combination of strawberries, grapes, blackberries, apples and oranges).
Add a splash of orange juice and honey and stir.

Buttermilk Cake with Homemade Whipped Cream


This is a cake recipe that comes from a cookbook I have called Super Natural Every Day, but I found a similar recipe posted on her website here.  Just omit the large grain salt at the end and I used blackberries instead (I've even used apples before).  What I love about this cake is that it's not very sweet or heavy.  I like to make homemade whipped cream to go with it... it's the perfect complement and completely worth the time.

Whipped Cream

With an electric mixer, beat 1/2 cup heavy whipping cream until it has soft peaks.  Add a splash of vanilla extract (about 1 tsp) and some sugar (about 1 tsp - or to taste) and only beat long enough to incorporate.  You have to be careful not to beat overly long or the cream will quickly look like butter (don't ask me how I know - smile). 


Have a great weekend!  I'm sitting here watching the rain come down and hoping for some motivation to work on a project or two today...

P.S.  One last reminder that there is still time to enter the giveaway for the Pfister kitchen faucet!  

Friday, April 26, 2013

On The Back Porch


 Just a quick post to let you know I'm on Anita's back porch today at Cedar Hill Ranch.  (I just wish I really was visiting... doesn't she have the most beautiful porch?)  Anita is extremely creative and talented, and she's also such a lovely and thoughtful person... you will love visiting her blog.  

Anita asked me some questions that took a lot of thought... and I even dug around for some old photos from my childhood (smile).  

You can find the post here.  

I hope you all have a wonderful weekend! 

P.S.  There is still time to enter the Pfister giveaway for the kitchen faucet and I just had to mention that I have thoroughly enjoyed reading the comments left about your kitchens! 

Image Courtesy of Cedar Hill Ranch


Tuesday, April 23, 2013

Pfister Faucet Giveaway

 I've mentioned a couple times that we're in the process of working on the second phase of our kitchen renovation, so it was absolutely perfect timing when Pfister contacted me a while back.  I hadn't really considered installing a new faucet this year, but when I headed over to their website, I found the most gorgeous faucet.  Not only was it a faucet that would complement our vintage sink, but its design reminded me so much of the antique well pump in our back yard... it fit our farmhouse aesthetic perfectly. 

 I'm excited to show it to you in another post and especially thrilled that there will be a couple opportunities for one of you to win one of their beautiful faucets.  I know you will love them just as much as I do! 


I'm sure many of you have admired Pfister faucets before... Pfister has been making faucets for over 100 years and when I looked around their website in detail, I realized there really was a faucet for every individual style, whether it's kitchen or bathroom.  I also love that they have a warranty that covers finish and function for life.

 So last week a package arrived in the mail from Pfister, but it wasn't my faucet... it was a faucet for one of you!

http://s7d1.scene7.com/is/image/Pfister/f-531-4hny-sq-c1?$ProductDetailLarge$
Image Courtesy of Pfister

 This pull-down faucet is European-inspired and called the Hanover... it has two handles, a matching soap dispenser, and my favorite, a high arc.  I actually took a couple of the parts out of the box and I was so impressed with its quality.  You can tell this is a faucet that will last a long time...  and having seen many leaky faucets, that it has a never leak guarantee is a huge deal.   


 The faucet I selected is also a pull-down and I can't wait to install it.  You simply press this little button on the side and it easily pulls down.  It also has a spray volume control and swivels. 


The finish is Tuscan Bronze... isn't it beautiful? 

http://s7d1.scene7.com/is/image/Pfister/f-531-4hny-rct-v5?$ProductDetailLarge$
Image Courtesy of Pfister

You can find more details about the Hanover here on Pfister's website. 

TO WIN:

Required Entry: Simply leave a comment below and answer this question... What's your favorite thing about your kitchen?
(Reminder: You do not need to have a blog to enter, but be sure to leave your email address so I have a way of contacting you.)

Bonus Entry: Like Pfister Faucets on Facebook and leave an additional comment letting me know you did so.  You can find them on Facebook here.

Giveaway will be open until next Tuesday 11:59 PM CDT.  A winner will be randomly drawn and will receive one (1) Hanover 2-Handle, Pull Down Kitchen Faucet.

Thanks for entering!

***This giveaway has closed***


Sunday, April 21, 2013

Fun, Family and Five


 Our sweet Jillian turned five on Saturday... it hardly seems possible that five years have gone by since I held her for the first time.  I'll never forget that moment and the love and joy that instantly filled me.  She is so sweet and funny and my little helper... I couldn't be more proud of her.  

We had a fun little "Pinkalicious" party for her on Saturday and I couldn't help but share a few pictures from the day. 


 After lunch and cake, we all went out in the beautiful sunshine and played some games (including the adults)... old-fashioned games like three-legged and wheelbarrow races.  We laughed and laughed... so much fun. 


 The girls with Grampie...


Even Huck joined in the festivities... I'm not responsible for putting the pink bandanna on him, but he was just too cute not to photograph (smile).

Hope you had a wonderful weekend! 

Thursday, April 18, 2013

Snowball Blossoms and Living Room


We've had several warm days in a row... warm enough that we've had all the windows open in the house letting in the fresh spring air.  The girls and I have made sure to have time every day to soak in some sunshine... they've ran around and I've planted my garden and too many flowers to count.


 The snowball bush is in bloom and its blossoms are one of my favorites.  Yesterday evening I put together a couple cut bouquets with its blossoms and some daffodils... every now and then as a breeze has come through today I've caught its sweet, light fragrance. 


Not long ago I finally purchased a rug for our living room.  I've put off purchasing one as I can always think of a hundred other things I should be buying instead, but I received a gift card to Target, and when I ventured through the rug aisle I found the rug.  It's a cotton and wool blend and a nice, soft spot for the girls to play.

It gets plenty of use as you can see (smile).  

I hope you have a wonderful weekend.  I have a little girl turning five on Saturday... as you can imagine, we are on the countdown!

Saturday, April 13, 2013

All About Painting Cabinets


 We have several projects in the works right now... usually I wait until we're finished to share pictures, but this time I thought I'd take you along with me (especially since it takes me so long to complete anything these days).  I've had repainting our kitchen cabinets on my list for too long to count now... this isn't particularly a fun or exciting post, but if you've ever considered painting cabinets, I thought it might be a little helpful.  This is also where I interject a disclaimer that I am not a painting expert, particularly in the cabinet department, but I thought I'd share a few things that I learned along the way.  

Tip #1: Never underestimate the power of paint

BEFORE

 This was what our kitchen looked like when we purchased our house (this was actually taken on a walk-through, but you get the idea).  It was certainly not my ideal kitchen, putting it mildly.  We've lived here three years now and we are still working on the kitchen, but the most dramatic change by far was painting the cabinets.  It's also one of the most affordable ways to makeover your kitchen.  In our case, although the cabinets were ugly, they were rock solid and in great condition... there was just no reason to replace them when all they needed was a little TLC. 

AFTER

Was it fun painting the cabinets?  Definitely not... but I would do it again in a heartbeat.  Justus and I 
painted them almost two years ago exactly and we worked on them for hours one weekend.   

(You can see a peek of our new flooring here... I LOVE it... but we still have the trim to tackle.)

  Tip #2: Invest in good quality paint


 Our cabinets, walls, ceiling and trim are all painted Simply White by Benjamin Moore.  The cabinets, ceiling and trim were painted with semi-gloss, but I used eggshell on the walls.  I used latex paint because I was pregnant when we painted them the first time...  I suspicion that oil-based would probably have better results, but I've never tried it, so I can't say for sure. 

Yes, Benjamin Moore paint is expensive, but it is so worth it!  I usually compromise a bit and purchase the Super Spec, which is a little cheaper.    

The first time we painted the cabinets, I removed all the doors, and sanded all surfaces lightly before applying one coat of primer and then three coats of the Simply White.  

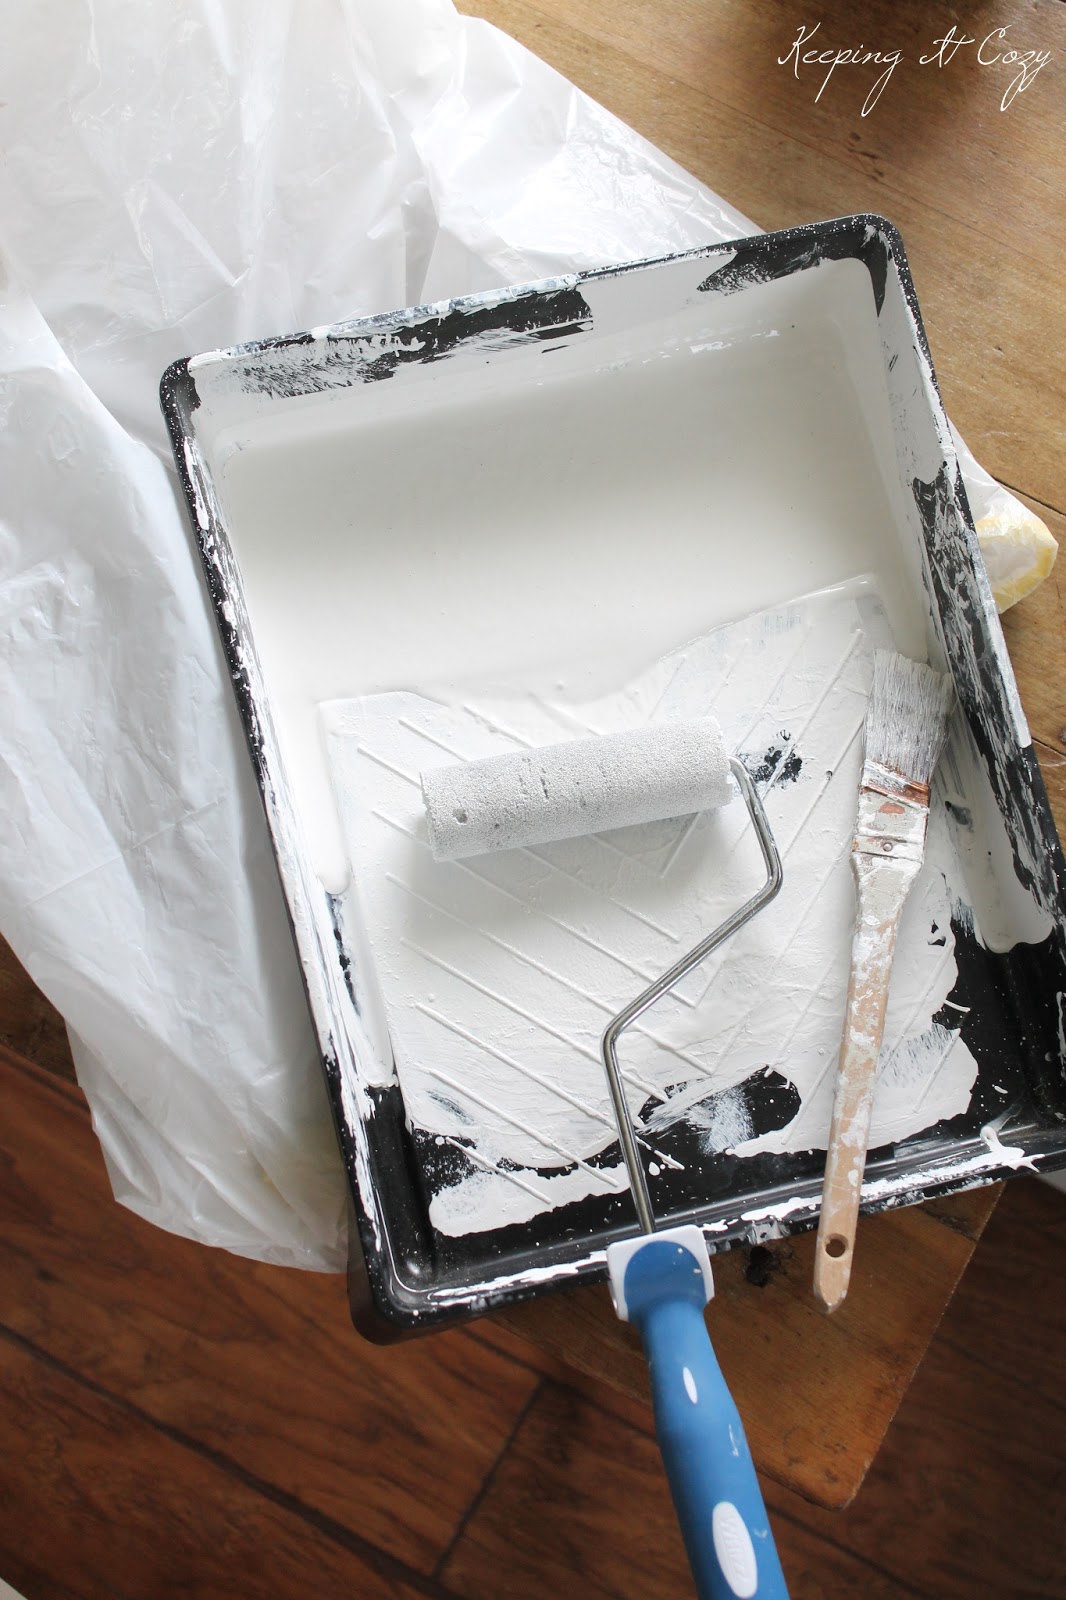
Tip #3: Buy a cabinet paint roller


 Our local paint store advised me to spend the $6 on this little cabinet roller.  Oh my goodness, that was the best $6 I may have ever spent... every time I go to the paint store, I just want to hug the man in gratitude.  Unless you really want the brush strokes on your cabinets, this is your go-to item... it is quick, easy and accurate when applying the paint.  I just about was able to paint everything with this roller... there were only a couple places that I had to use a brush.  I personally love the smooth finish it leaves, and I've also used it many times since for painting doors.  

Tip #4: Go light on the paint


 I don't know about you, but sometimes I tend to want to use a lot of paint because I think that it might mean I don't have to paint so many coats.  Usually that is not the case and then I have to deal with drips.  Especially painting cabinets, go easy on the paint... it might mean you have to apply one more coat, but my experience with this roller is that if you apply light coats, it dries quickly and leaves a wonderful, even finish.

Tip #5: Repainting


Well, two years passed since we painted our cabinets... two years of cooking, opening and closing cabinet doors too many times to count, spills, you name it.  It was time to repaint the cabinets... they were showing their wear.  I would have to say that although they were badly in need of repainting, I was surprised they had lasted as long as they did.  This time around all I did was remove the pulls... I left the hinges on.  I repainted every surface, but my main focus was on the doors.  I went with two coats... the above picture shows only one coat, which really was sufficient for most areas, but there were some spots that I felt needed two.

AFTER

I spent three days on this project this week but only about 2 1/2 hours total... I put one coat of paint on every evening after the girls were put to bed and then allowed the paint to cure the following day. I have put off this project for so long, but it really was effortless... I wish I would have done it a long time ago.  Now I know that repainting the cabinets is really a simple task.

Tip #6: Save time by not rinsing


 This was a tip I learned only last year and I will forever be thankful to Linda with It All Started With Paint for sharing this on her blog... I wish I would have known about it all the years I painted and had to rinse my brush and tray every. single. time I had to take a break.  Maybe I'm the only one who doesn't know this... but just in case you were like me, you can put your brush in a ziploc bag and it will prevent the paint from drying... just take it out the next day and you're good to go.  In this case, since I was using a tray and roller, I just stuck everything in a garbage bag and closed it up tight.  Never once did the paint dry up and then it was a simple task of getting it out the next evening to apply another coat of paint. Obviously, I wouldn't go too long without rinsing, but in this case, I didn't rinse until the third day.

Tip #7: If you use a roller, do not try to touch up with a brush later on

BEFORE

 This was a lesson I learned the hard way.  Several months ago there were a few spots that were driving me crazy so I just took a brush with a dab of paint and painted the spot.  I can't explain what happened, but over the months since, the spots where I used a brush turned dingy, the paint looked crackled and it also looked dirty.  Not good!  You can see a few of the spots in the above picture next to the hardware (as usual, I forgot to take a "before" picture so I found this one from a couple months ago and zoomed in).  Lesson learned - from now on I'll get out my trusty roller. 

AFTER
Tip #8: Remember that you can fix any mistakes


 Although we had a few spots in this area that were looking really bad, when I put the hardware back on, I let out a huge sigh of relief.  It's nice to remember with painting that you can always fix it...

Using a Sealer


This time around, I used a top coat sealer.  Rust-Oleum sent this to me after our New York trip... this is part of their cabinet transformations package.  I applied a very light coat of it... the next morning I could see a faint shine and it feels slightly different to the touch, like the paint is harder.  It feels like it left a good cure and I'm hoping it will be a good barrier of protection against minor chips, stains, etc.  I'll let you know in a year or so!


 I can't tell you how relieved I am to have this task completed... our cabinets looks clean and crisp again and I'm ready to move on to the next step... in the next few weeks I'll be painting trim once Justus puts it up, refinishing our sink and installing a new faucet. 

Oh, what a long post... I hope it might be helpful to at least one of you.  If you have any questions or any advice, feel free to leave a comment!

Have a great weekend!  I'll be outside planting my garden today... (smile)

Tuesday, April 9, 2013

Mini-Makeovers at Country Living


A while back I was asked if I would contribute a photo and idea for a story on Country Living's website.  It was all about quick mini-makeovers... I spent a few days thinking it over and kept coming back to the pantry post I had done a couple weeks before.  As a busy mom myself, nothing makes me feel better than a makeover that is quick and easy and combines organizing and decor all in one.    

Above is the photo I sent them... I had such a great time rearranging our pantry and took the opportunity to give our old cabinet a little makeover at the same time.  

BEFORE:


 As you know, I love the old cabinet we use as a pantry but the inside did look a little rough.  Although the outside is painted white, I had never done anything inside other than give it a thorough cleaning.  I actually like the all wood interior in its natural state, but I thought the door could use a little freshening.  So I painted a coat of white on and then a light coat of ASCP in Paris Grey, followed with a little clear wax.  

AFTER:


I love the way it turned out... it not only looks better, but feels better to the touch.  In addition, I put a coat of ASCP Paris Grey on the lower shelf, which is the only part of the cabinet that is not original.     


You can find the tips I shared here, along with several other great ideas shared by some fantastic bloggers (I love the sugared berries by Gourmandistan so much that I plan on making some to use for Jillian's birthday cake coming up in a couple weeks).  I'm so honored that Country Living asked me to be a part of 7 Mini-Makeovers You Can Finish Fast... I hope you'll head over and check out all the inspiration! 

Thursday, April 4, 2013

A Tree Swing


 I have this memory of a tree swing at my grandparents' country home.  It hangs from a huge weeping willow tree branch in New Mexico and it's where I spent countless hours as a child swinging and daydreaming. 

We have a couple huge trees on our property (and when I say huge, I mean huge).  When we first moved, my husband hung a swing from one of the trees and we had so much fun swinging from it.  But unfortunately, last year the tree had to come down as it was dying and since then we have been meaning to hang another.


 So over the weekend, in the midst of working on the chicken house and installing a new kitchen floor, I added another project to our my husband's list and asked him to cut a piece of old barn wood that I could sand for the base of the swing.  In my mind, it was just a simple project of tying a rope to a piece of wood and hanging it, but fortunately Justus was a little more realistic and put some more time in it to ensure it would be a swing to last (smile).


 The base of the swing is 20" long.  It's an extremely old piece of wood that was warped, but that made it just perfect for this project.  I sanded it and applied a coat of poly before Justus drilled holes on each end and bought 30' of hemp rope to string through the holes.  He had the perfect location for the swing, but it meant climbing way up high on the ladder (and scaring me half to death).  He drilled pilot holes in the branch, screwed in eye screws and attached the rope to D-rings. 


 This is the side of the yard that once was our driveway, but we moved it to the other side of the yard last year and gradually the grass has started to grow back.  You can kind of see in the picture above how the rope is secured to the branch.


  There is something so magical about climbing on this old-fashioned swing... inevitably, you feel like a kid again as you go flying through the air and there is just no way you can keep a smile off your face.


 Of course Jillian goes running for the swing any time we go outside. 


 "Higher, higher...!"


 Rosetta has gotten her turn as well, although she's a bit more cautious (or maybe I should say, I'm a bit more cautious). 


I love her sweet little laughter.  


Isn't it funny how our childhood memories can influence us later on so much?  I didn't really realize until writing this how many little things I enjoy and find beauty in because of memories at my grandparents'.  Like the sound of our screen door squeaking as it opens and closes, and how I planted lemon-balm by our front porch because it reminded me of the peppermint my grandma always had growing next to their patio.  Every time I sit on our new wooden swing, it just takes me back to those carefree summer days as a child... I can almost smell the peppermint and the roses and hear the screen door slam as I would swing back and forth...

Copyright @ Keeping It Cozy. Blog Design by KotrynaBassDesign