
When we went to Florida early this summer, we first stopped to spend a few days with our good friends that moved there. They had the most beautiful wood console sitting in their living room, which Justus and I both admired and I told Justus I would love something similar for a coffee table. My friend told me that somebody had made theirs out of pine and it was an Ana White plan. When I commented on the gorgeous stain, she said it was steel wool and vinegar. Wow! You know I could hardly wait to come home and research that. It didn't take me long to find the plans and wouldn't you know it, there was a plan for a coffee table and an end table!
Recently I went to visit my sister-in-law for the weekend, and when I came home Sunday night, I found the coffee table sitting in the guest room. Justus had made it for me while I was away and surprised me. (I know, it made my heart melt too.) Since the coffee table was made and ready to go, all I had to do was research the steel wool and vinegar method. I don't typically share project tutorials here, but this was the most fun I've ever had working on furniture and thought you might enjoy trying it too.
You'll find a lot online about using this method, but mostly I wanted to share photos during each phase, because it takes a lot of "ugly" steps before it reaches the "pretty"! When I first stained the coffee table, I thought for sure I had ruined it, but I loved the end result. Needless to say, I didn't take any photos at that time, so these are photos from the matching end table that Justus built.

Step 1: At least a few days prior to working on your wood project, you'll want to create your steel wool and vinegar solution. This consists of purchasing distilled white vinegar and grade #0000 steel wool (I used Rhodes American Steel Wool #0000 found at Wal-Mart in the hardware section). Tear one chunk of the steel wool into pieces and then place in a glass jar. Fill the jar with white vinegar, screw on a jar lid and let the solution sit. When I worked on the coffee table, the solution sat for three days. When I worked on the end table, the solution sat for three weeks. Both match perfectly. You just want to allow enough time for the solution to oxidize.

In addition to the steel wool and vinegar solution, you will also need sandpaper for the initial sanding (I used 120 grit), black tea bags, a cheap paintbrush, 220 grit sandpaper (I used a block) for the finish, and wax.
Step 2: Brew some strong black tea and let steep for at least an hour. I filled our tea kettle and used 5 tea bags.

Step 3: Sand your furniture. I used 120 grit sandpaper for this and my trusty old mouse sander I've had for years.

I really like to take my time sanding, paying attention to all areas. These pieces were for our living room, and I wanted them very smooth and polished looking. Once you're finished, wipe down the piece good. I actually used my blow dryer first to blow all the wood shavings off and then followed with a lint free rag.

Step 4: Using the cheap paintbrush, paint tea all over the piece. This sounds like such a funny step, but it's really essential. Pine wood lacks tannin content, but tannin occurs in tea, and the steel wool and vinegar will react with the tea stain and darken the wood. I made sure I did one very thorough coat, getting in every nook and cranny. On the table tops and legs, I actually did two coats. Use your judgement - on the wood that looks very light in color, you may want to use a little extra tea. Let the wood sit until completely dry.

Step 5: Strain the steel wool and vinegar solution into a bowl. There may be little steel wool particles left (as pictured above) that you will need to throw away. I found there to be a lot less in this solution, which sat for 3 weeks. (A note of caution: use a bowl you don't care about.)

Step 6: Begin painting your steel wool and vinegar solution onto the wood. Both times I used the same cheap paintbrush I had just used for the tea. The first time I did this step, my heart started pounding and I was sure I had made a dreadful error in trying this experiment on my beautiful new coffee table. I frantically started sanding as the wood got darker and darker, to no avail. I decided to let it sit and started working on the bottom of the piece. After a while, I saw it might have promise.

Some of the wood you will paint will be light gray in color. Then other areas will appear black (see picture above). Do not worry about it - I promise it will look right in the end.

As the solution sits, it will get darker. This is a great example of the "ugly" stage. On areas you've already painted and it has begun to dry, the color will have turned a dark gray (see outer edge). When you first paint, the color will be a light gray-tan.

But as the solution begins to dry over the entire piece, you'll begin to have hope.

(If you happen to build a table using this same plan, Justus didn't attach the table top until I was finished with the stain as it made it much easier to work with.)

Step 7: Even though your piece is looking so much better, you'll have a few places where you can clearly see drips (see photo above on right hand edge) and even areas where the wood is darker. This is where the fine grit sandpaper comes in and this step makes all the difference. I used a 220 grit sandpaper block.

Just lightly sanding over the area removes the drip stain and helps the color blend (see above). I used the sandpaper over the entire piece, focusing on areas that needed extra blending. Be sure to wipe down the wood after you've finished sanding.

Above is what the table looked like after doing the finish sanding. Don't you love the weathered wood look? I've never been fond of using stain on pine, but this method is so different and really eliminates the yellow color of pine showing through. Looks like fun, doesn't it? It really is!

Step 8: The final step is a wax finish. By the way, at this point I've only worked on this for a few hours or so, even waiting for everything to dry, so it's a fast project. Annie Sloan wax is the only wax I've ever used and I love it, so that's what I decided to use. I can't say whether or not wax you can purchase at the hardware store is any different, but I've found this wax is easy to apply and I love the finish after it cures.

Using a disposable knife, I placed the wax on a paper plate and used a lint free cloth to apply the wax. (I've found that old fashioned Gerber cloth diapers work great!)
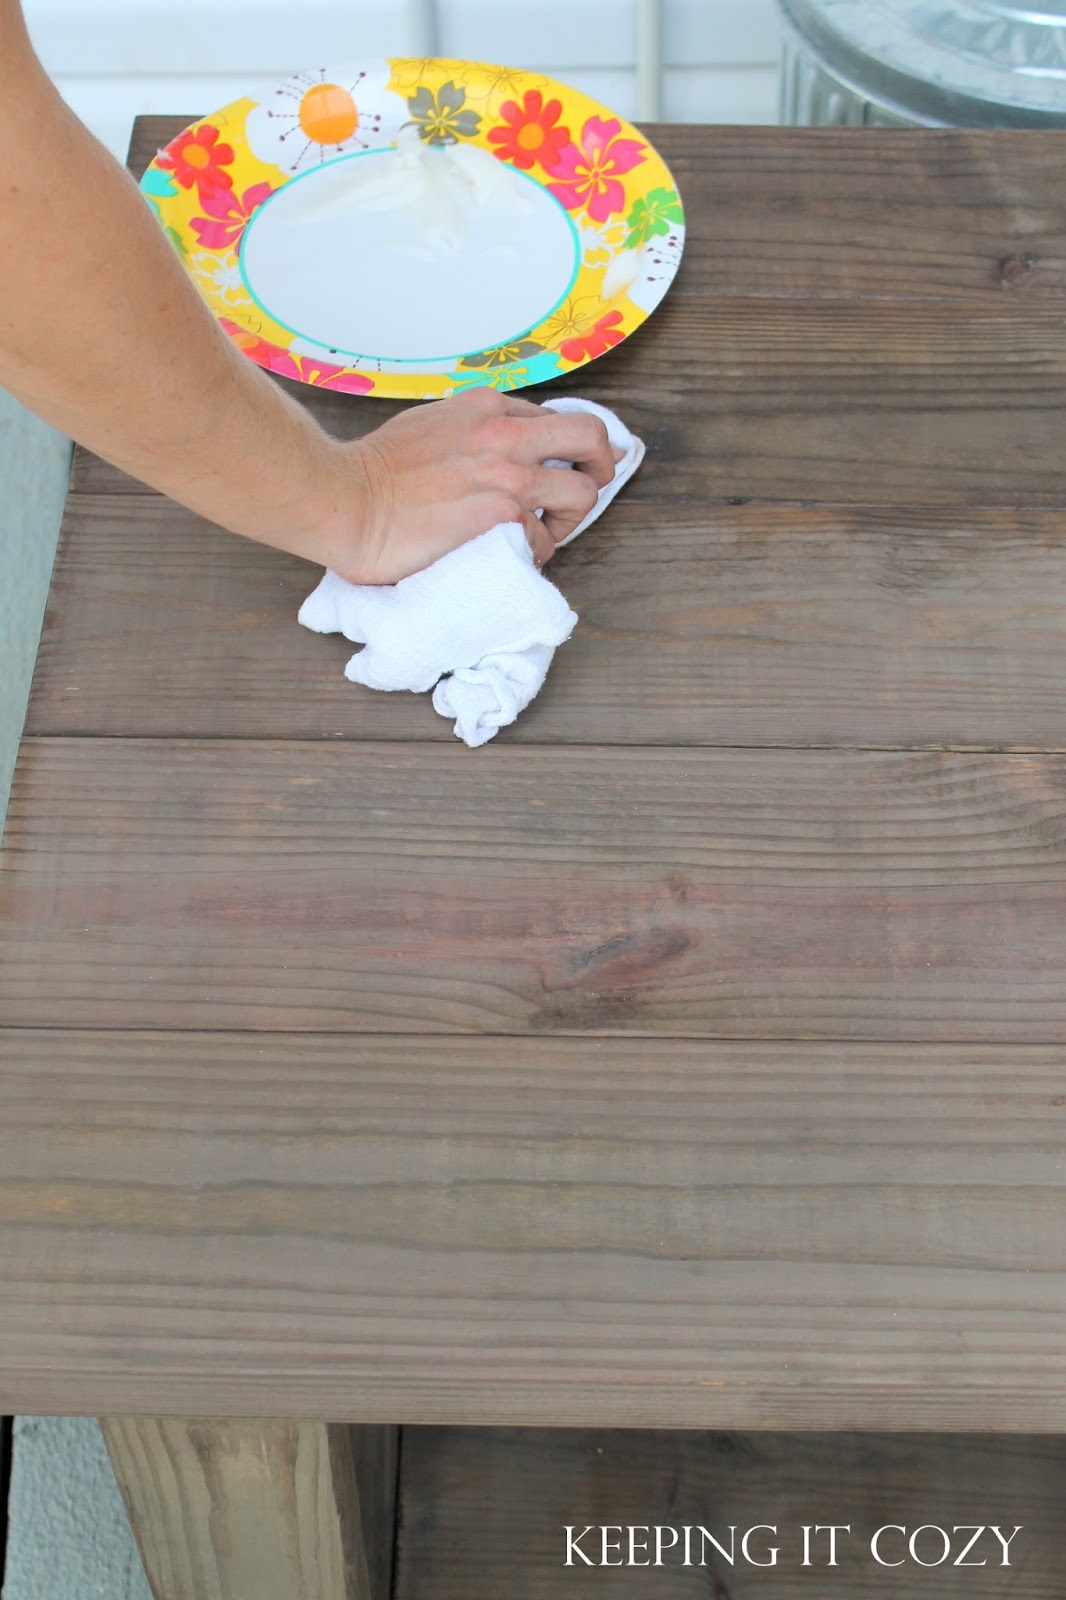
I've used a wax brush before, but the cloth seems to work perfect, especially on intricate areas. You can see the wood is starting to look more brown and polished as the wax is applied. I applied a couple light coats of wax over the entire piece.

Step 9: Finished! The wax will take a little while to fully cure, but you can use it gently pretty much right away. I'm so happy with the way these tables turned out, and especially love them in our living room.

I'm not sure if the wood really looks like barn wood, but it definitely has a weathered rustic look, yet is still very polished and clean (hopefully kind of Pottery-Barnish). I'll show photos of them in the living room soon!

What a great project!
ReplyDeleteOh I love these SO MUCH. (Justus... your mother in law wants a couple for her porch!) :-) (Excellent tutorial, by the way.) - Mom -
ReplyDeleteI have never heard of this method and the results are beautiful!
ReplyDeletelove the tables!
ReplyDeleteWOW - that is pretty! It looks like driftwood. Thank you for showing us - love that you showed all the stages - both pretty and the more worrying ones - that prevents a lot of panicing when I am going to try myself very soon! Have a whole can of Annie Sloan wax that I now what to do with!
ReplyDeleteBest regards
Christine in Denmark
Great post! I found it very useful. Love the final result. Thanks for the inspiration and the tips.
ReplyDeleteKingston upholstery cleaners
I just love how that turned out! I've heard of that type of finish before, but have never tried it myself. Your husband is an amazing carpenter and so sweet to surprise you like that! Can't wait to see the furniture set up in your house.
ReplyDeleteWow, I live this so much I'm pinning it for a future project! What a wonderful finish to have available, and what a wonderful husband to surprise you like that :>)
ReplyDeleteBRILLIANT!!!!
ReplyDeleteLove how it turned out so inspired now!
Thank you.
Justus made the coffee table and end table as a surprise for you? What a wonderful husband! Beautiful stain to finish it off. Kathleen in Az
ReplyDeleteIt's gorgeous. You both are so talented...
ReplyDeleteCan't wait to see them indoors!
Just found my next project ;)! I love it!
ReplyDeleteAwww... what a sweet husband! Where did you find him? Does he have a brother???
ReplyDeleteSeriously- such a gorgeous table. Cannot wait to see photos of coffee table and end table in your beautiful living room.
Your posts always make me smile!
Wow...that table looks fantastic!....thanks for the step by step procedure in weathering wood...it truly looks naturally weathered....Beautiful table!
ReplyDeletebeautiful.....nice job
ReplyDeleteLooks amazing! Your husband is so talented in his carpentry skills. :)
ReplyDeleteHeather @ GreenWay Home
So beautiful!!! I purchased a plain wood table from Ikea. I'm wondering if I could do this on our table. Hmmm . . . Thanks for sharing!!! Have a wonderful weekend!! : )
ReplyDelete~ Wendy
http://Crickleberrycottage.blogspot.com/
Beautiful! Love the tutorial! I found this method and gave it a try but did not have any success because it did not give such great instructions to go with it...May have to try it on something else again!
ReplyDeleteThanks so much for the fantastic instructions. - so precise and detailed! Can't wait to use this process on some wooden Christmas decor!
ReplyDeleteHow long does it take for the steel wool to start dissolving in the vinegar? Also, is it normal for the steel wool to float to the top before dissolving?
ReplyDeleteIt may take a while before you really start to notice it dissolving. However, I used the solution for the coffee table after it sat only three days and the solution for the end table sat for three weeks. Both are identical. Yes, it is completely normal for it to float to the top and sit there! Hope that helps. I highly suggest "testing" the solution on some wood first if you're wondering if it works!
DeleteI adore this project. How often do you have to re-wax to keep it looking this great?
ReplyDeleteI've been a painter for over 25 years and learned this trick long ago. We always used it when people would have fence boards replaced on old fences. Sometimes you have to dilute the vinegar down with water to match the old boards, but if done right you can't tell the new wood from the old.
DeleteThanks, Emelie. Not often! I only re-wax when I feel like it needs another coat, but since this project, I've only re-waxed the top of the coffee table since it gets a lot of use!
DeleteI adore this project. How often do you have to re-wax to keep it looking this great?
ReplyDeleteVery nice! Did your vinegar solution turn brown? In other tutorials I've seen it does, but mine is still clear after a day and a half. There are only little tiny bits of steel wool floating around in it. It is also off-gassing something as if I keep the jar lid on tight I can hear it seeping out. This concerns me so I am keeping it outside. Any ideas?
ReplyDeleteThis sounds exactly right... my solution was also clear with the steel wool floating on top. Basically it looks like the solution isn't changing at all. I always say, when in doubt, try a little of the solution on a scrap piece of wood first, but I'm sure it will be just fine if you followed the instructions in this post!
DeleteWow, looks great! I've tried to do the steel wool vinegar stain, but it's been sitting in the jar for two days and hasn't changed color the slightest! Any idea why it's not working for me? I live in England actually and I'm using white malt vinegar. Could that possibly be it? Thanks very much for your help. Looking forward to hearing from you!
ReplyDeleteIs it really only just one chunk of the steel wool? The bag came with about 11 chunks- just want to make sure :)
ReplyDeleteWhat happens if you skip the tea step? Will it keep the gray color?
ReplyDeleteLet the vinegar have some air to oxidize. Don't seal the jar
ReplyDeleteCaution: Making iron acetate produces hydrogen gas. Do not seal containers and keep in
Deletea ventilated area.
I am loving the results! Do you have tips for cleaning clothes that get some splashes of the solution?
ReplyDeleteBeautiful! Appreciate the particular guide! I ran across this technique as well as afforded this a try but did n't have any achievement given it wouldn't give such fantastic guidelines to look with it... Might have to test it with something more important yet again!
ReplyDeleteCan't wait to try it. Do you need too apply a knotting solution to any knots in the wood first (using pine)? Any recommendations for the best to use? Also, any recommendations for weatherproofing after for use our side?
ReplyDeleteI did not apply a knotting solution and I haven't seen any issues. I would not use wax if you are going to use your finished product outdoors - I would use a sealer that is specifically for outdoor use. Hope that helps!
Deletegreat post. Your blog is interesting and so informative. Wait for your next blog post. Thanks for sharing with us.
ReplyDeleteI used the instructions for a platform bed and barn door headboard but i mistakenly applied a second coat of vinegar and steel wool solution. I went from a great finish to having blotchy brown spots. I'm guessing I'll have to sand it off and see how it looks. Has anyone else made this mistake? And how did they fix it?
ReplyDeleteDo you get water rings on the coffee table since it is only protected by wax? I have 3 kids and coasters are not used in our house...
ReplyDeleteUse coasters...(rocket science).
DeleteDid you get water rings since it's only protected with wax? We have 3 kids and I am worried about not enough protection for our well used coffee table
ReplyDeleteThe wax should help protect against water rings, but honestly, I avoid putting water glasses directly on the furniture.
DeleteCan I spray the vinegar mixture with spray bottle as well? Or do I need to use paint brush ?
ReplyDeleteI would use a paint brush - I would be afraid that the vinegar might dry splotchy if using a spray bottle.
DeleteGreat post! Did you paint one or two coats of vinegar per piece of furniture? How much wax coats? Thank you!
ReplyDeleteI love this! Turned out beautiful! I'd like to ask two questions..1. Is it best to let oxidize without a lid and 2. I let my mix sit for 3 days (mason jar with mix) and tested on pine. However part of the wood turned a beautiful greyish color while the other part of same board barely turned color due to less grain I guess. I sanded and tried again and same outcome. I'm worried when I stain my raw pinentable the outcome will be the same. Did you encounter this issue at all?
ReplyDeleteHave you ever tried applying the vinegar+steel wool solution, letting it dry....then apply a traditional stain over it?
ReplyDeleteI'd assume a water based stain wouldn't work - it might cause rust stains from residual steel wool left in the wood, but an oil based stain wouldn't suffer from this. And since the vinegar solution reduces the natural yellow of the wood it might produce different results when the stain is applied.
I just built a table from those plans with my husband, and looking for a stain/finish. Thank you for the step by step, I am grateful! Soaking steel wool now and hoping to get started on it tomorrow!
ReplyDeleteSomeone told me that pressure washing wood can be useful to do if you want it to look newer. Good post!
ReplyDeleteHi, amazing result! I might try this method, I was looking for the same effect and this looks awesome my only concern about it is the vinager smell which is very strong, i want to apply it on a indoor furniture, but the smell worries me. Who has tried it and if the vinager smell doesn't affects.
ReplyDeleteThank you
Vinegar is totally safe to breathe in so don't worry about that! As far as the smell, it'll dissipate fairly quickly I would imagine. I clean my entire house with vinegar all the time (counters, furniture, walls) and the smell disappears within an hour usually leaving no scent behind :)
DeleteCan I use polyethylene instead of wax?
ReplyDeleteGreat tutorial! Thanks for this! Off to buy this stuff today. So funny I googled how to make this stain and your table is the same table I'm making! ��
ReplyDeleteHi there,
ReplyDeleteIn the step before appying the wax it had the matte driftwood look.But after applying the wax it seemed to turn dark shiny brown. How do you keep the driftwood look?