Showing posts with label From the Kitchen. Show all posts

Thursday, October 10, 2019

German Apple Pancake Recipe


This feels like our first official week of fall here... cooler weather finally arrived!  Despite the heat, we managed a trip to the local apple orchard and as I prepared supper one Sunday evening recently, I grabbed my camera on a whim and took some shots as I was cooking to share one of my very favorite recipes with you! 
 
(All the apples we came home with from the apple orchard!)
 My mom made German apple pancakes my entire childhood, and when I married, she gave me this recipe along with some other family favorites.  I've now made this for my own family more times than I could possibly count and it's always a crowd pleaser, whether you're cooking for guests or your own family.  I've hoarded this recipe a little, but my mom shared it on her blog a couple years ago (you can find that post here), so I think I'm safe to share it here.  :-)  

I'm posting this recipe now because it's absolutely a perfect fall weekend treat.  You will probably find us eating a German apple pancake and a plate of bacon most Sunday evenings, but it's delicious on a Saturday or Sunday morning too.


  For the pancake, you will need 3 eggs, 3/4 cup milk, 3/4 cup all purpose flour, 1/2 tsp salt and 1 1/2 Tbsp butter.  Preheat your oven to 450 degrees.  I use a large cast iron skillet (12") for this recipe, and I do think it works best, but you can also use a large stainless steel skillet if you do not have a cast iron skillet.  

A couple substitution notes: Whole milk and all purpose flour work best for this recipe as far as getting a good fluffy rise.  However, I've successfully substituted almond milk for whole milk and a GF flour blend for all purpose flour many times and it's still delicious, you just won't achieve the same rise.   


Begin by placing the 1 1/2 Tbsp butter in your skillet and setting it in the oven to melt (but not brown) while you combine the rest of the ingredients.   Whisk together the eggs, milk, flour and salt in a bowl or dump the ingredients in a blender and blend until smooth. 


Remove the hot skillet with the melted butter and carefully swish around so the side of the pan is covered with butter.  Pour the batter in and place in the oven for 15 minutes.  After 15 minutes, reduce the oven temperature to 350 degrees and cook for an additional 10 minutes.  Do not be alarmed when your pancake puffs up in large bubbles... you can pierce them with a fork if you need to, but I personally love all the bubbles.  

(Also note that my butter definitely is browned in this photo... the exact thing I said you shouldn't let happen to your butter in the oven.  Yes, this is exactly the kind of cook I am - ha!  Ugh, if I waited for perfect photos though, I may never post!)


 Meanwhile, take four large apples, and slice them fairly thin.  I leave the peel on. 


 Place them in the skillet with approximately 3 Tbsp butter (or more if you like) and 2 Tbsp maple syrup (completely optional... I usually make ours without any added sweetener). Add a little sprinkle of cinnamon and/or nutmeg if you prefer.  Saute over medium heat until apples are tender, but not too soft.  Set aside.


 Here's a picture of the delicious, bubbly pancake right out of the oven, all crisp around the edges. Remove the pancake from the hot skillet and place on a platter.


 Place the cooked apples on 1/2 of the pancake.
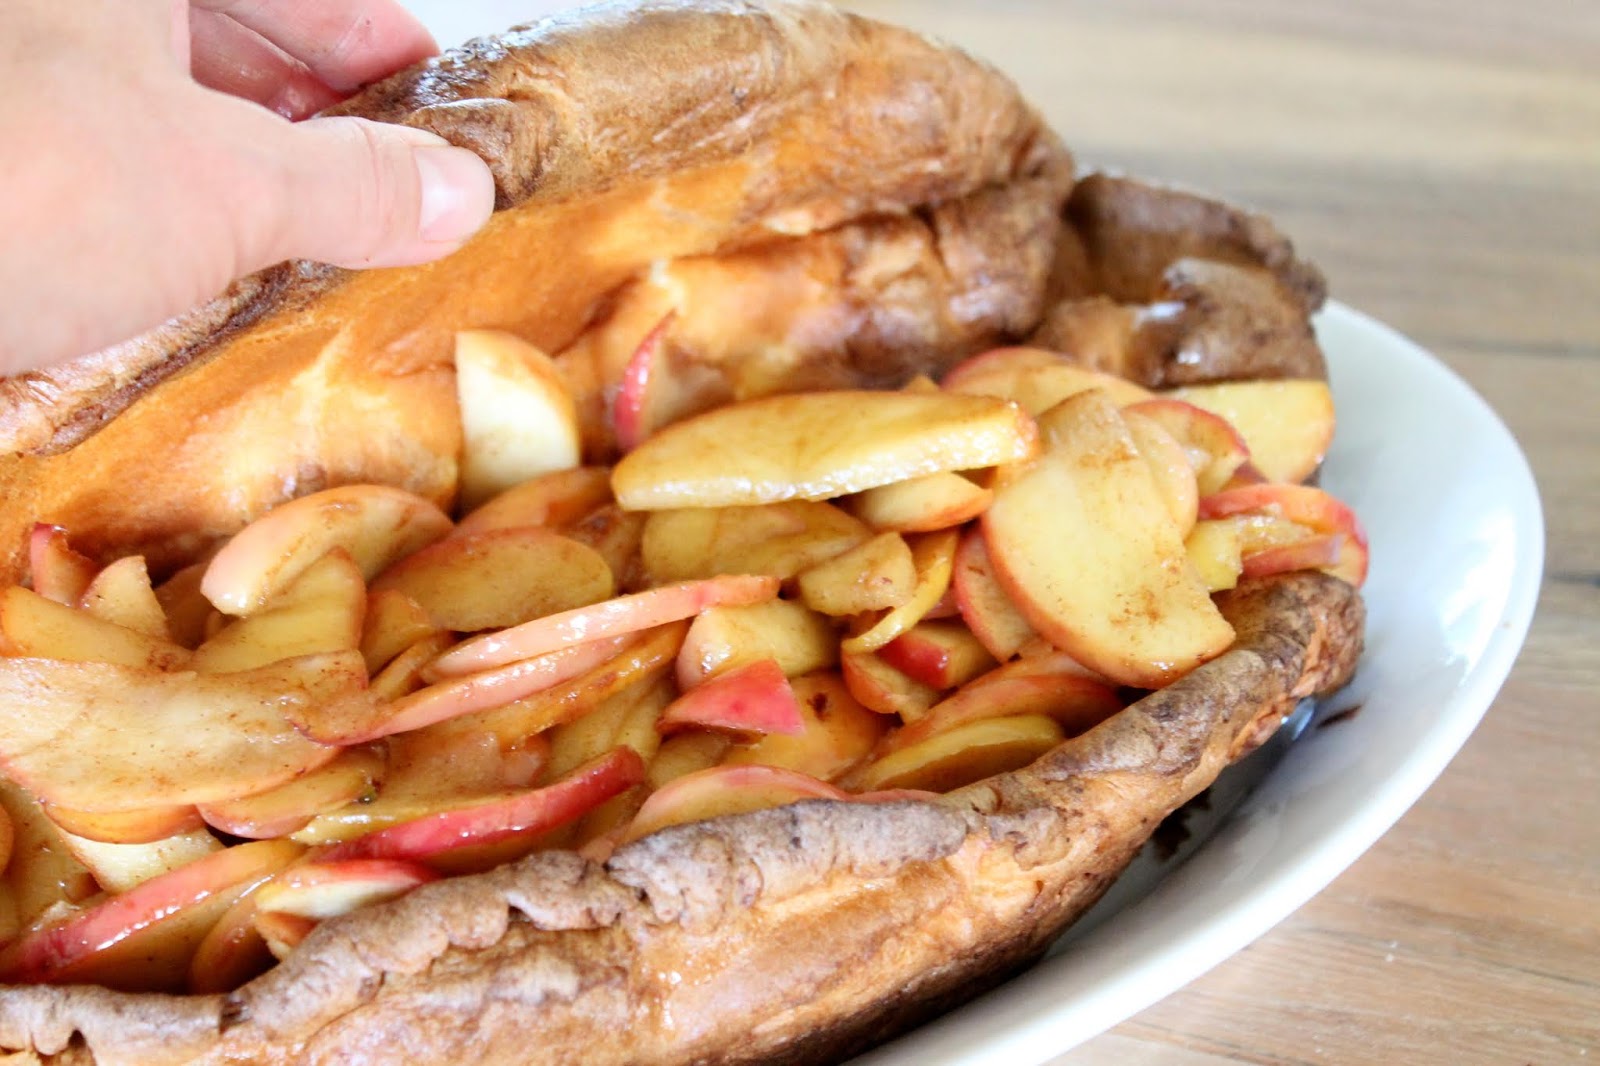

 Then fold the other side of the pancake over the apples. 


 To make this really decadent, sprinkle the entire pancake with a dusting of powdered sugar.  (Also completely optional... but I had to show you how pretty it can be!)

I usually go ahead and cut the pancake into slices before serving, even with guests, as it makes it a lot easier.  Serve immediately!  You can eat this plain as I do, but I always place some maple syrup on the table as well, as my children, husband, and most guests love to drizzle maple syrup over the top (smile).   

I hope you try this and love it as much as we do!  


GERMAN APPLE PANCAKE RECIPE


Ingredients

Pancake:
3 large eggs
3/4 cup milk
3/4 cup all purpose flour
1/2 teaspoon salt
1-1/2 Tbsp butter

Filling:
4 apples
3-4 Tbsp butter
2 Tbsp maple syrup (optional)
Cinnamon and/or nutmeg (optional)

Sifted powdered sugar for the top (optional)
Maple syrup for serving (optional)

Instructions

Preheat oven to 450 degrees.  In a 12" skillet, melt 1 1/2 Tbsp butter by placing skillet in the preheating oven (do not let butter brown).  Beat together the eggs, milk, flour and salt in either a bowl or in a blender until smooth.  Remove the hot skillet from the oven and swish the melted butter around the skillet so that the sides are covered in butter.  Pour the batter over the melted butter in the skillet and place in the hot oven.  Bake for 15 minutes.  After 15 minutes, reduce the oven temperature to 350 degrees and bake for an additional 10 minutes.  The pancake should be light brown and crisp.  (During the first 10-15 minutes of baking, the pancake may puff up in large bubbles.  You can either leave these or gently pierce with a fork.  I always leave them.)  

While the pancake is baking, prepare the apple filling.  Core apples and slice thinly.  Place in a skillet with 3 Tbsp butter and maple syrup (optional) and saute over medium heat until apples are tender, but not too soft.  You can season to taste with cinnamon and/or nutmeg if you prefer.  Set aside.

Remove the pancake from the oven and slide it onto an oval platter.  Pour the apple filling over one half of the pancake and then fold the other half of the pancake over the apples.  Sprinkle with sifted powdered sugar.  

Serve immediately with maple syrup. 

Wednesday, September 4, 2019

Seasons of Home: Fall Kitchen and a Tea

Fall Kitchen Decor

 I'm always a little sad to bid summer goodbye, and yet each season is such a gift.  Fall is no exception, and I love the subtle shift as the seasons change.  As our new school year begins, and the mornings bring a brisk feel, I love bringing a few elements into our home that welcome the new season.

I'm excited today to be joining a group of talented bloggers (all linked at the bottom of this post) in the first installment of the Seasons of Home tour (hosted by the talented Kristen from Ella Claire blog) starting in the fall kitchen!  For me, it isn't so much about the decor in the kitchen as it is the feelings, the smells, the colors. 

Fall Kitchen Decor - Keeping It Cozy

Fall brings about feelings of coziness, warmer colors, smells of cinnamon and pumpkin in the kitchen.  We are so fortunate to live in an area that we have access to so many local fruits, and while it's always a little bittersweet as the fresh peaches fade away, seeing the first sweet apples available instantly makes me excited for fall. 

Fall Kitchen Decor - Keeping It Cozy

It's not quite pumpkin season here yet, but just by adding some local apples, a candle, and some cinnamon spiced baked goods, our kitchen is slowly welcoming in a new season. 


 I love adding in little touches of brown here and there... a color that doesn't always fit in so well with other seasons, but is just perfect right now.


Do you find yourself spending a little extra time in the kitchen each fall like me?  There's just something about fall baking! 


The girls obviously have favorite things to look forward to each season.  During the fall season, they love our annual trip to the pumpkin patch, school activities with friends, the county fair, and so much more, but one of their favorite things we start back up in the fall is our little afternoon teas at home. 


 We started doing this several years ago.  We don't have tea every day or even always at a certain time, but we try to fit it in as much as we can, especially as the days get cooler.  The girls love helping me prepare all the tea fixings and sitting around the table together. 


 This year we actually prepared a tea tray, as we have tea often enough to keep everything close by, and I thought this might be a fun opportunity to share our little tradition.


 The girls love adding sugar cubes and milk into (decaf ;-) ) black tea (with British accents of course).  This is also an opportunity to actually use some of my pretty dishes!  ;-) 


 I always include a little treat with our tea.  Since the girls obviously already have quite the sugar intake (the sugar cubes are just too tempting - ha), I try to balance it with a "healthier" treat.  This apple snacking cake actually doesn't have any flour in it, but uses almond butter, which gives us some protein and healthy fats to help us last the afternoon.  I'll share the recipe below!  This is a delicious tea cake, just lightly sweet and very filling.  I like to add in chunks of fresh apple and some pecans.  We have been known to have scones with our tea, but for the most part, I usually try to have something that I feel is a little better for us.


 (Like I mentioned, the sugar cubes are the best part according to the girls!)


 The girls actually refer to our teatime as a "tea party", but as you can see our teas are very informal, and yet feel special with pretty dishes and time carved out.  We often sit at the dining table, but sometimes the kitchen island is a pretty perfect place to land.  We've even been known to read some poetry at our teatimes on occasion.  ;-)


 The sign of a successful teatime... there's always a mess to clean up, but I wouldn't have it any other way.  :-)

Apple Cake Recipe
Recipe from Pamela Salzman
Makes 1 Cake

Ingredients
  • Butter (for greasing pan)
  • 1 cup creamy, unsweetened, unsalted almond butter
  • ⅓ cup maple syrup
  • 1 teaspoon ground cinnamon
  • ¼ teaspoon ground nutmeg
  • ¼ teaspoon salt
  • 1 teaspoon baking soda
  • 1 large egg
  • 1 teaspoon vanilla extract
  • 1 large apple, peeled, cored, and cut into ¼” cubes
  • 1 cup chopped pecans
Instructions
  1. Preheat oven to 350 degrees. Grease a 9" round pie plate with butter. If you want to remove the cake from the dish in one piece, you can line the bottom with parchment paper. You do not have to grease the parchment paper.
  2. In a large bowl combine the almond butter, maple syrup, cinnamon, nutmeg, salt, baking soda, egg, and vanilla until smooth.
  3. Stir in apple pieces and nuts.
  4. Pour into prepared dish and bake until just set and a toothpick comes out clean or with dry crumbs. A 9" pie plate will take 35-45 minutes. Allow to cool before eating.

And last, but certainly not least, please visit the following bloggers for some beautiful fall kitchen tours and inspiration!

Thursday, January 28, 2016

Let's Talk Salads!


Winter has truly arrived and along with it comes a craving for all things warm.  Our supper each night usually consists of something that comes right out of the oven hot and ready to warm us as we sit down at the dining room table.  Winter dishes - roasts, stews, roasted veggies - are one of my favorite things about this season.   Recently Justus asked me to start preparing him a salad to take to work each day for lunch though, and as I've assembled the salads each night, I've made more of a conscious effort to eat a salad for lunch the next day myself.  I've actually made this citrus salad two days in a row... it's just so, so good and the fresh produce tastes so refreshing.  I think it just makes me enjoy those hearty winter dishes even more in the evening.  

Salads are actually one of my favorite things to eat, but I think variety is the key.  If you eat the exact same salad ingredients every day, it doesn't take long for it to get old.  Speaking for myself here, a salad that consists of a huge bowl of lettuce with a sprinkling of shredded carrots and two cherry tomatoes on top just doesn't cut it for me.  

Here are some things that help me when putting together a salad:

  • Theme!  Before I start cutting up veggies, I think about what flavor I ultimately want the salad to have.  Feeling like something sweet?  How about a base of spinach with some fruit and nuts?   Feeling in a Southwestern mood?  Then I'm leaning more towards a base of romaine lettuce with tomatoes, corn, avocado, cilantro.  Think of different ingredients that can work together to add more flavor.  This also might depend on the main dish I'm making, if this is a side salad. 
  •  Use what you have!  Do you have any leftover chicken from the night before?  What about cooked veggies, say some roasted butternut squash (here's a delicious salad recipe that you could use butternut squash in, by the way). What about that avocado half that will go bad if it's not eaten?  A lot of times I'll build my salad around something that needs to be eaten, again making sure that the different ingredients will complement each other. 
  • Toppings!  I stock up on toppings when I go to the grocery store.  Nuts (like almonds, pecans and walnuts), seeds (sesame, poppy, sunflower, chia, hemp), cheeses (feta and blue cheese crumbles are a big hit with my husband), dried sweet fruit (raisins, cranberries), tortilla chips, you get the idea.  I think these can be the key to a salad... they add so much texture and flavor and leave you feeling satisfied.  
  • Variety!  I usually buy at least two varieties of greens, and mix it up the next time.  Our favorite salad greens are romaine (green and red), butter lettuce, spinach, and a spring mix.  I buy an assortment of veggies and fruits, a lot of time depending on what is in season.  (Tip to the mommies out there!  If your little ones have a hard time eating salad every meal/day because of the lettuce, chop up extra veggies for them and make a "salad" without the lettuce!  Today for lunch my girls had a mixture of chopped cucumber and bell peppers with a side of orange slices along with their main dish.)
  • Salad dressing!  I rarely ever buy salad dressings, simply because I'm very picky about ingredients.  I actually bought one last week for my husband for the first time in ages... he requested something very spicy!  (Speaking of, I found a delicious chipotle vinaigrette at Whole Foods.) On the rare occasion we have ranch dressing (usually when we have guests), I make it from scratch using this recipe. Anyway, I typically just make a vinaigrette and I have a formula I use that is so simple!  No matter how you change it up, it's delicious, easy, and healthy.                                                                                                                                                                                                                             This will make about 3/4 cup of dressing, so you can either store the leftover for later, or make half the recipe.  Thoroughly mix together 1/2 cup extra virgin olive oil, 1/4 cup of either vinegar or a citrus juice, 2 tsp dijon mustard, 2 tsp maple syrup (honey would also work well), and sea salt and freshly ground black pepper to taste.  I always keep balsamic, apple cider, red wine and white wine vinegar in the pantry along with a few others.  There are so many delicious options!  Lemon, lime or orange juice are also delicious in place of the vinegar.  On occasion I'll omit the maple syrup if I don't want the vinaigrette to have any sweetness.  
Lastly, here is the salad recipe pictured above.  It's delicious and I hope you enjoy it.

Citrus Salad

Ingredients:
Baby spinach
Romaine lettuce 
Celery
Oranges (I used Cara Cara)
Pecans 
Raisins
Feta Cheese
Poppy Seeds
Vinaigrette (see above under salad dressing; I used 1/2 cup extra virgin olive oil, 1/4 cup orange juice, 2 tsp dijon mustard, 2 tsp maple syrup, sea salt, and ground pepper)

Preheat oven to 350 degrees.  Place pecans on a baking sheet and toast for about 5-8 minutes.  Chop spinach, romaine, and celery and place in a bowl.  Peel orange(s), slice and place on lettuce.  Sprinkle toasted  pecans, raisins, and feta cheese over salad.  Add some poppy seeds to your vinaigrette and pour over entire salad. 

 **************************************
Have you made any delicious salads recently?  Please share - I'm always looking for something new!  ;-)


Tuesday, October 20, 2015

Meal Idea: Chili


 I don't know about you, but once October rolls around, I start craving all things fall in the kitchen... including lots and lots of chili!  I think we all probably have our favorite ways of making chili.  There are so many variations, and so many things you can add or take away.  I've been making this variation for a few years now and it still remains our favorite.  :-)  


 This recipe uses your typical chili spices, although lately I've been substituting ground chipotle for chili powder.  Either way it's delicious!  I think chili is probably one of the easiest meals to put together, and usually something that everybody loves.  Even my husband, who isn't a big fan of soup (so disappointing, I gotta tell you ;-) ), loves chili!  And our girls gobble this up so quickly, although I do go a little lighter on the spice because of them.


 This year I have two nights a week that require complete meal prep, as we arrive home right at dinner time with everyone hungry.  So I've been using my crock pot a ton!  I love making chili, because when I'm struggling to get everything done before we get out the door, I can always throw this chili together quickly in the crock pot.  You can also just simmer this on the stovetop though, if that works better for you, which I do a lot during the weekend.  And leftover chili?  It only gets better!

I typically bake a big skillet of cornbread too and have some type of veggie on the side.


 Chili Recipe

 2 pounds ground beef
3 ounces tomato paste (or half of a 6 ounce can)
1 14.5 ounce can diced tomatoes (including juice)
2 cups water
2 teaspoons oregano
1 Tbsp ground cumin
1-2 Tbsp chili powder or 1/2-1 Tbsp ground chipotle powder (I go on the light side because of my little girls - feel free to add more/less depending on your taste)
1 tsp salt

Place the ground beef in a skillet (I like to cook my ground beef in a cast iron skillet), season lightly with some salt and freshly ground black pepper, and cook until done.  Drain off excess fat and place the cooked ground beef in a pot or slow cooker crockpot.  Add the tomato paste, diced tomatos, water, oregano, cumin, chili powder or chipotle powder, and 1 tsp salt.  Stir together, cover, lower temperature, and simmer for at least 1 hour on the stovetop or cook on low in the crockpot for several hours.

Optional Add-In: Pinto beans are an obvious great choice!  You can so easily throw in a can of beans with everything else, but drain and rinse them first.

Toppings: Nothing makes this better than freshly grated monterey jack cheese and a big glob of sour cream!


Tuesday, January 13, 2015

Baked Sweet Potato Fries


 True, once upon a time I published a recipe for baked sweet potato fries here.  But I really felt like these deserved a post all on their own... a slightly different variation, these are my absolute favorite vegetable side right now.  I've been making these at least once a week this winter and my entire family loves them.  In fact, this is the only way my husband will eat sweet potatoes!  They work great as a side dish and also as a satisfying snack.


 The hardest part about this recipe is the slicing.  Which means they are a cinch to make!  While I really love the small sweet potatoes for baking whole, the large work great for the fries because you don't have to peel as many potatoes.  Once you get a little assembly line going, you'll have the sticks sliced in no time.  In this case, the thinner the better too! 


  This recipe is for 3 large sweet potatoes, which is about 12 cups.  I know, that's a lot of sweet potatoes!  This amount feeds about 4-5 adults and I promise there will not be one left.  If you have a smaller family, you can easily cut the recipe in half. 


 I think the best part about these fries is the mixture that coats them: 3 Tbsp each of extra virgin olive oil, maple syrup and Dijon mustard.  So much flavor.  (Recipe adapted from My Father's Daughter cookbook.)


 Coat the fries evenly with the mixture (using your hands or a large spoon) and spread them into a pan for baking.


 Trust me on this one, place parchment paper in your baking pan first!  It not only makes clean up easier, but also helps when turning the fries.  Now place them into a 425 degree preheated oven and bake for about 30-40 minutes.  You will want to shake the pan every now and then or use a spoon to stir them around so they bake evenly and don't burn.  Also, watch them closely towards the end! 


 The fries are ready when they are slightly browned and crisp on the outside and tender on the inside. If you like your fries extra crispy, turn your broiler on and broil them for a few minutes, watching them closely to ensure they don't burn!  (This is how my family loves them!)   

(Note: I baked mine for 40 minutes and then broiled them for 3 minutes, stirring frequently.  However, cooking time and your preferences will vary so keep a close eye on the potatoes as they cook!)

New! I tried to do a printable recipe for you ... just click photo below to print.   

https://drive.google.com/file/d/0B9wsOJy-0yhNOFBJeWl0SFI5dzQ/view?usp=sharing

Copyright @ Keeping It Cozy. Blog Design by KotrynaBassDesign