
Happy Spring!
After spending at least an hour every evening (after the girls were put to bed) and Saturdays that weren't already planned, we finally (almost) completed our master bedroom renovation! For five years we stared at styrofoam ceiling tiles that covered a ceiling that couldn't be salvaged and walls that were covered in paneling that had been wallpapered and painted over. During our five years here, we've had a lot of house projects that have been doozies - both bathrooms top the list - but this bedroom project was right up there too. I imagine we put this project off for so long, not only because we had other projects that took priority, but likely because we knew this wasn't going to be a fun one!
BEFORE:

This picture pretty much sums up the bedroom in its former state. Yes, there are those styrofoam ceiling tiles, and once the paneling was removed, we discovered more very old wallpaper. Underneath the wallpaper was the original bead board, which was overall in pretty good condition. We did have some places around the fireplace that had been damaged by water, but not noticeable at all once painted.

I can still hardly believe how in tact this very old wallpaper was. You'd like to think it would be easy to scrape off after so many years, but it was very time consuming and laborious. I first pulled this section off two years ago. Justus came home from work and said something along the lines of, "Oh, Andrea, what have you started?!"

My heart actually dropped for a second when I downloaded these pictures onto our computer. I realized that somehow I deleted all of the "in progress" photos of this renovation and all I could think was, Where is all the proof of how horrible this was? :-) I did find the above one on my cell phone. We were able to use all of the original bead board, with the exception of adding some new pine bead board to cover a previous doorway (more on that later).
It took us a few weeks to remove all the paneling and wallpaper. We took it in small, manageable sections because of the mess, and I also painted as we went along, which helped so much.

Two years ago, when I first removed a piece of paneling, I wondered if I should leave the wood bare. After living with a few sections bare for the next (gasp - was it really that long!) couple years, I realized that I couldn't live with the walls in our bedroom that dark. Fortunately though, I didn't have to feel guilty at all about painting the wood as there were areas that were water damaged and we had to do quite a bit of caulking to seal cracks and holes. Painting was certainly the best solution.
As you know, most areas in our home are a mixture of white and wood, but in our bedroom, I felt like a little change. I painted the walls in a light gray called Titanium by Benjamin Moore that I used in our living room and staircase. Once painted I had to laugh though, because while the same color does indeed look gray in other areas of our house, it took on a bluish tint in this bedroom. It made the room feel so calming and peaceful though - I just adore it.
I painted over the bare wood with Zinsser BIN Primer. It smells positively horrible and drips everywhere, but it works like nothing else I have ever used in sealing the knots and stains in wood (both new and old). I applied one coat of primer, and then only two coats of paint after that. I use Regal Select by Benjamin Moore, which is fabulous. Both of these are more costly, but the end result is so worth it.

While were were able to use the original walls, the ceiling was unsalvageable. We purchased pine planks and installed with the beaded side showing. (We could only find this product at one Home Depot store.) This is a large room and we had to purchase about 65 planks - phew! I primed and painted one coat before Justus installed and then applied the final coat once it was hung. I painted the ceiling and trim Simply White by Benjamin Moore. We purchased the light at our small local hardware store.

I sewed the curtains a few years ago... anticipating that one day I might have a pretty room to use them in. :-)
BEFORE:

Above is one of the only photos I could find of our bedroom shortly after moving in that showed a previous doorway between the master and another bedroom. This was fabulous when we had an infant, but not so much now. ;-) We had one doorway leading into the dining room, another into the bathroom and then this one into the guest room, not to mention the closet. A large room with little useable wall space!

We decided to create a wall over the doorway in both rooms. Fortunately Home Depot sells pine bead board that looks almost identical to the original bead board in our home once painted.
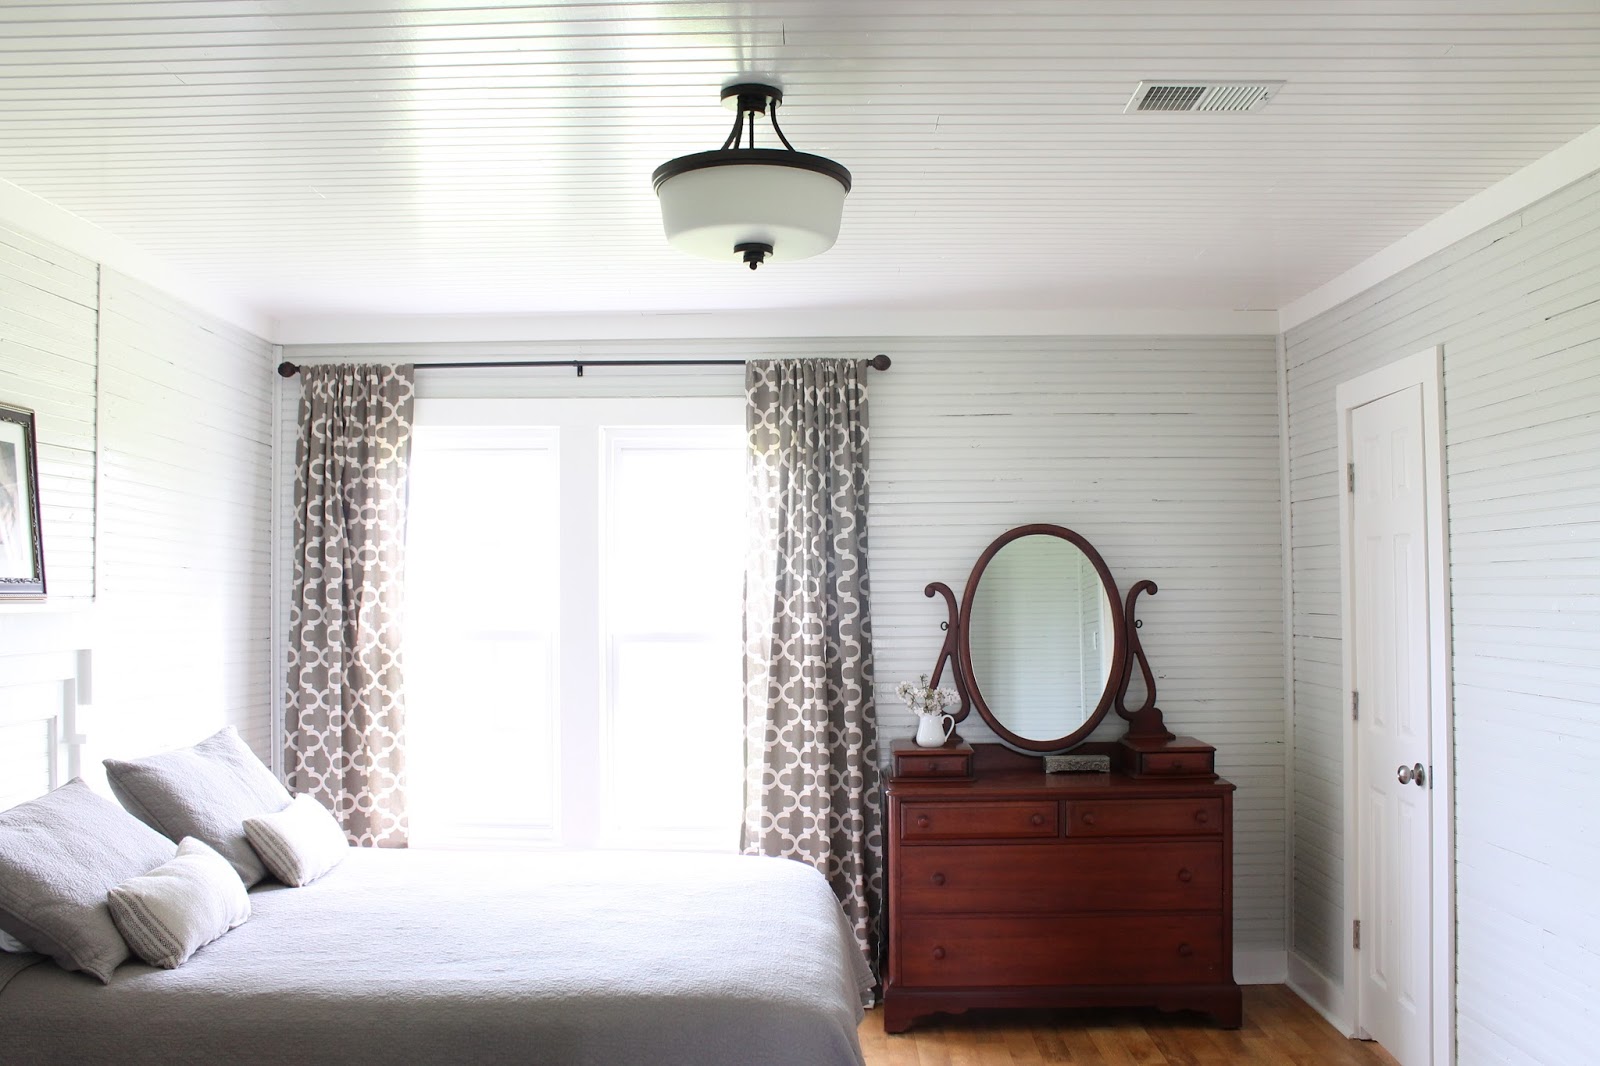
AFTER:

It's nice to have a little more wall space - and privacy - in the room now! The little doorway to the left of the dresser is a closet that sits under the stairs. It's quite primitive inside - there is still bark on some of the wood in there, although we did add some new flooring!

I purchased both dressers in our room last year at an antique store. I think they are my favorite antique find to date! We went shopping to look for a his and hers dresser, not imagining we would ever find a set. I walked into the last store of the day and I spotted this dresser at the far end of the store. It looked in such good condition that I imagined it would be far out of our price range. When I looked at the price tag, I gasped and after proclaiming that this was it!, I said to Justus that now if it only came in a set. At that point, I literally turned and there was the other dresser sitting, that piece in our budget too. We purchased them right then and there! ;-) They were made in TN and are guesstimated from the 1930s.

The quilt is from Restoration Hardware (purchased on sale, I might add). Justus doesn't much care how I decorate the house, but he has always drawn the line at having a floral bedroom. ;-) So I tried to compromise by purchasing things he wouldn't feel were too feminine, yet were still things I found pretty.

The fireplaces are capped off and are unusable (they were coal burning). We added new pine bead board in the insert to try and make it look more cohesive with the rest of the room.
BEFORE:

Above is a photo of the bedroom when we did a walk-through. Seeing pictures like this always help me - I realize how far we have come!
AFTER:

We have not replaced the closet doors yet and we plan to replace the door going into the bathroom with a sliding barn door in the next couple months. We also have not decorated yet as you can see, so I'll share more pictures again after we make these last updates. :-)

We are working away in the guest bedroom now. At the first of the year we decided to spend every spare minute completing the last of our interior house projects. We are both so ready to be finished and not feel like we have projects looming over us all the time. ;-) We had a finish date of April, which looks more like May at this point, but we have an end in sight, which is very exciting! So my blog posts might continue to be sporadic for now, but I sure hope to get back to regular posting after things settle down a bit. :-)
Hope you all are doing great and are having a wonderful Spring!
Andrea, good to hear from you. I remember the post about your bedroom and seeing the results, I love it! So farmhouse and the dressers, perfect! What a long tedious job and like you said, only when you had the time. I had a feeling there was a big project in hand.
ReplyDeleteYou and your husband are certainly making this house your forever home for your family, full of hard work and love.
Take care, Kathleen in Az
Thank you so much, Kathleen! Out of the three bedrooms we are finishing, the master was certainly the biggest project... we are on the finish line now, I think. It will be fun to share everything here in the next couple months! (I'm also looking forward to the decorating part! ;-)
DeleteYour bedroom is so pretty, and I love that new paint color! You did a good job with all that bead board too!
ReplyDeleteAw, thank you, Jennifer. The paint color is a keeper for sure! ;-)
DeleteWhat a big project Andrea - even the ceiling! Great job! I bet it feels so nice to have a "new" bedroom to sleep in. :) I am also hoping to update our bedrooms this year... nothing as major as a ceiling, but they could all use some freshening up for sure. Enjoyed reading this post! ~julie
ReplyDeleteOh, it does feel so wonderful! We moved in and when I woke up the next morning, I could hardly believe I had a pretty bedroom. ;-) I know your bedroom updates will be gorgeous! Can't wait to see them.
DeleteAndrea, it really looks like how I imagine a farmhouse. Simplicity and beauty, and so restful looking. Love the colors and the contrast of the dark wood against the light. The wallpaper removal probably was the most tedious part, but lining up the interlocking planks is hard too. Great idea to paint as you went along to stay on course. That's a great product at Home Depot. We used it in several rooms of our old house for example on the porch on the wide side, and it my spouse's office and our shed on the bead board side. We also used it as exterior siding on the wooden areas of the house. xoxo Su
ReplyDeleteThank you, Su! My poor husband had the job of interlocking the planks - I only helped with a handful that were giving him trouble. I don't know how he did it, but he finished the entire ceiling one Saturday! Yes, it is a great product and it looks beautiful in your home! I love your porch.
DeleteYou and Justus have done an incredible amount of work and your room has turned out beautifully. I'm sure you are loving having a calm and peaceful retreat at the end of the day. Great job!
ReplyDeleteThanks, JoAnne. We are oh so happy to no longer be staring at styrofoam ceiling tiles! :-)
DeleteYou and Justus have worked miracles and done such a great job! And there is nothing like the thrill of finishing a project like this - congrats!! I love everything about your "new" bedroom.
ReplyDeleteAw, thank you, Betty!
DeleteAbsolutely gorgeous, Andrea! The timing was right for your bedroom renovation because you found those beautiful dressers, in budget and 1930's. So happy for you, and so good to see your post in my inbox :)
ReplyDeleteHappy Spring! Deni
Thanks, Deni... The dressers definitely gave some good motivation to start working on the bedroom. The paneling didn't quite do them justice. ;-)
DeleteTruly a labor of love as it definitely shows!...Such a most gorgeous transformation. Love the walls and ceiling and love all of your choices of decor. You two did an amazing job!
ReplyDeleteOh, thanks so much, Shirley!! I am so anxious to "decorate" the room now. ;-)
DeleteLooks wonderful, Andrea! All your hard work and patience has paid off for sure!
ReplyDeleteThank you, Megan! I've loved seeing your plans for your new homestead. :-)
DeleteYour bedroom looks so calm and relaxing, your hard work has paid off!
ReplyDeleteThanks, Melissa!
DeleteYour bedroom looks so calm and relaxing, your hard work has paid off!
ReplyDeleteIt's really beautiful! Can't blame him for not wanting floral.
ReplyDeleteThank you, Kim. Yes, I can't blame him either, especially after all the work he did in the room! I actually have some subtle floral prints that I've been eyeing for the walls... I'm hoping he will be okay with a couple tiny prints. ;-)
DeleteLots of work but oh so pretty!
ReplyDeleteThank you! I think I'm almost to the point of saying it was worth all the work. ;-)
DeleteBeautiful! I love your antique dressers and how they add warmth to the room. Everything is so light and bright and peaceful. Great job.
ReplyDeleteIt is wonderful to see a blog post from you, I check all the time, thinking I may have missed the email notification :) I love these updates, we are knee deep in renovations in our 1920 farmhouse and you are such an inspiration. Enjoy spring! Thanks for the post!
ReplyDeleteThat just makes my day! Thank you! I imagine your home is just beautiful. :-)
DeleteUm...I love it...but it is ALL 12x12 ceiling tiles! After 5 years my husband finally ripped down our living room ceiling as my Valentines Day gift :) he knows the way to my heart!! I have to say though, like you, I finally parted with my sweet front door that I LOVED, and had a new custom door put in that is 1920 style but fiberglass and much more wind proof. So funny how I was contemplating it, and then I saw your story about the same thing and I knew it was a sign :) its nice now to sit here and not see the curtains move when the wind blows!!
DeleteI understand how it can take a while to tackle certain projects... my husband and I both feel like ceilings are the worst! Just recently we removed the last ceiling tiles in the house (in the guest room). We thought we would need to put up an entirely new ceiling, but we discovered the bead board in good enough condition to salvage underneath. Unfortunately, it was covered in wallpaper! We were both so exhausted from removing wallpaper that we decided (for the first time) to hire somebody to remove it. But we couldn't find anybody that was willing, so we were back at it again - ha! My husband just put up the trim today and I'm hoping that's the last we'll ever see of ceiling tiles!
DeleteSo glad you are happy with your new door. It's a tough decision, but I have to say, so worth it!
Lovely! You inspire me. Your home is so much like mine in materials and layout, and I too have been staring at styrofoam tiles on my bedroom ceiling for several years. They are glued on which is why we have had no motivation to remove them. As soon as I saw this post, I immediately called my husband and told him we need to get busy planking the ceiling. I can't wait. Thanks so much sharing!
ReplyDeleteI'm so glad to know I'm not the only one that had to live with styrofoam ceiling tiles. ;-) Thank you so much for the kind words.
DeleteWhat an incredible room! All your work definitely paid off! How lucky that all that original wood was under those walls. It looks amazing painted, so I'd say you made the right call!
ReplyDeleteHi Andrea. This looks like a peaceful sanctuary; the way a bedroom should be. Well done. But I have a question that I have been wondering about for a while now. When I take the walls down in the two houses I have owned up here, they don't have this wood beneath that you have on all of your walls. Is there insulation and space for electricity and stuff behind these planks? Are these planks something that was commonly used behind dry wall or whatever kind of wall is on top of it? I just love them and wished that this was an option for me. Happy Spring! linda r (phila burbs)
ReplyDeleteThank you, Linda! The tongue and groove bead board planks are common around here in the south for this era of house. It almost seems like the boards were never meant to be exposed, since they were covered in wallpaper (walls and ceilings) and were never painted. It seems interesting though. The boards are attached to stud walls, so there is plenty of room for wiring and insulation.
DeleteThanks for letting me know, Andrea. Extremely interesting! About 6 years ago, I bought the home I grew up in. In the bedroom there were layers of wallpaper on the walls and ceiling as well. It was an extremely ugly job to remove and it wasn't even on wood planks. (I still have the closet to do, but haven't felt too motivated to do so.) You guys are my heroes!! linda r (phila burbs)
DeleteThanks for sharing a great collection of images and information.
ReplyDeleteCeiling Tiles
Your room is so beautiful, calm, and peaceful- I actually don't think "decorating" is necessary! Looks so cozy and farmhouse-ish. I love all your light walls and wood furniture. Also wondering about Linda's comment above. I have renovated two old homes (both built in the late 1890s with plaster walls) and I have never seen wood behind the walls- so curious about how your home was built. Anyway- very happy to see your post and your beautiful room. p.s.- agree with your husband about keeping florals out of the bedroom- your room now is neutral, elegant, perfect!!
ReplyDeleteThanks, Dana... I do plan to keep the decorating minimal, so thanks for your vote for that! ;-) It really is interesting to see how our home was built, as it is with all old homes. They all have character and charm, even with all the imperfections!
DeleteWhat an absolutely awesome project!!! I cannot imagine living thru the renovation process but the end result is spectacular. I've looked back thru your photos twice. Have really enjoyed seeing how you and your husband have brought this house back to life. Just wonderful!
ReplyDeleteAndrea, I just love the attention to detail that you share! Your projects are inspiring. I would love to see some sort of blueprint of your home as my husband and I are entertaining the idea of purchasing some land here in South Carolina, which would mean building our home. And, I've always wanted that farmhouse look.
ReplyDeleteAnyway, love, love, love your posts!
Andrea, this was a huge project involving so much hard work for both of you. No wonder you've taken a break from posting! The results are beautiful, such a clean, simple look! I love the dressers, sometimes it pays to keep looking for the perfect piece.
ReplyDeleteEsther
Love your blog. :)
ReplyDeleteJoanna
I just came across your blog, it's wonderful. You have done everything I've dreamed about doing with an old house. I'll be coming back on a regular basis to relook and see what's new. You also have a beautiful family. God Bless..
ReplyDeleteLove your blog Andrea, do you remember where you bought your curtains? Thank you
ReplyDeleteThank you! I actually made the curtains from fabric I purchased at Hobby Lobby. :-) If you are interested in the fabric name, I can try to look it up!
DeleteHi! This is a very late question but if you're still reading .... :) ..... Where did you get the beautiful ceiling fixture in this room (your master bedroom). I'm in love with it :) Thanks - peace and blessings in the coming year.
ReplyDeleteMary