Thursday, June 27, 2013

Blueberries and a Buckle


 Blueberry season arrived and off we were to fill our buckets earlier this week. 


 We're fortunate to live close to a couple pick-your-own blueberry farms... this was our first time visiting this farm and it was overflowing with rows of beautiful bushes.  We planted some blueberry bushes in our own backyard last year... they are producing berries but still very small... this farm had me dreaming of " maybe one day". 


 Since we were there at the beginning of the season, we had to pick for the ripe berries.  Next time we go I have a feeling we could simply stick our buckets underneath the clusters and let the berries drop.


 Of course I came home and the blueberries were just begging to be baked into something sweet.  I made this buckle (or coffee cake) one afternoon, which was a delicious treat, and may have been eaten for breakfast once... okay, twice... this week (smile).  This buckle isn't very sweet as I was trying to limit the sugar, so feel free to add more if you desire. 


 Blueberry Buckle Recipe

Batter
1/4 cup sugar (I use organic cane)
4 Tbsp unsalted butter, melted
1 egg
1/2 cup milk
 1 tsp vanilla extract
2 cups all-purpose flour (I use unbleached)
2 tsp baking powder
1/2 tsp sea salt
2 cups blueberries

Preheat the oven to 375 degrees.  Whisk together the sugar, melted butter, egg, milk and vanilla extract.  In a separate bowl, mix together the flour, baking powder, and salt.  Stir in the dry ingredients until combined.  Fold in the blueberries.  Spread the batter into a baking dish (I used an oval 1 1/2 qt casserole dish).

Topping
1/3 cup sugar
3/4 cup all-purpose flour
1 1/2 tsp cinnamon
1/2 tsp sea salt
 1 tsp lemon juice
4 Tbsp unsalted butter

In a bowl, whisk together the sugar, flour, cinnamon, salt and lemon juice.  Cut the butter into tiny pieces and add to the rest of the ingredients, using either a pastry cutter or your hands to create a crumb mixture. Sprinkle the topping over the batter.

Bake the buckle for approximately 50 minutes.


One last thing... if you happen to have any leftover blueberries!  The last couple years I have frozen blueberries... they are one of the simplest fruits to freeze and are perfect in the winter to add in muffins, pancakes, and baked goods.  I wrote a post on how to freeze blueberries last year, but basically all you do is spread them in a single layer on a pan, put them in the freezer for a few hours (or longer), remove the pan and place the frozen berries into freezable containers or bags. 

Happy Blueberry Season!

P.S. I also wanted to say thank you to Jennifer from Celebrating Everyday Life for featuring my blog today.  She is lovely and so talented... most recently she was featured in Southern Living Magazine and even publishes a beautiful magazine of her own.  Her blog is a real treat! 

Monday, June 24, 2013

The Front Porch


 I hope you had a wonderful weekend!  Over the weekend we finished our front porch remodel.  Yesterday afternoon I went outside with Rosetta, propped my feet on the coffee table and as we swung back and forth listening to the birds chirping, the feelings that came over me were exactly what I had hoped to accomplish with our project.  More than anything, I just wanted to create a space to enjoy the outdoors that was comfortable, relaxing and peaceful. 

BEFORE


This was a "before" picture I found buried.  It was taken about 6 months after we moved into our house.  My style has changed a bit over the past few years and we've done some yard work, but the elements (round aluminum columns, vinyl shutters, light fixtures, etc.) have all stayed the same until recently. 

AFTER


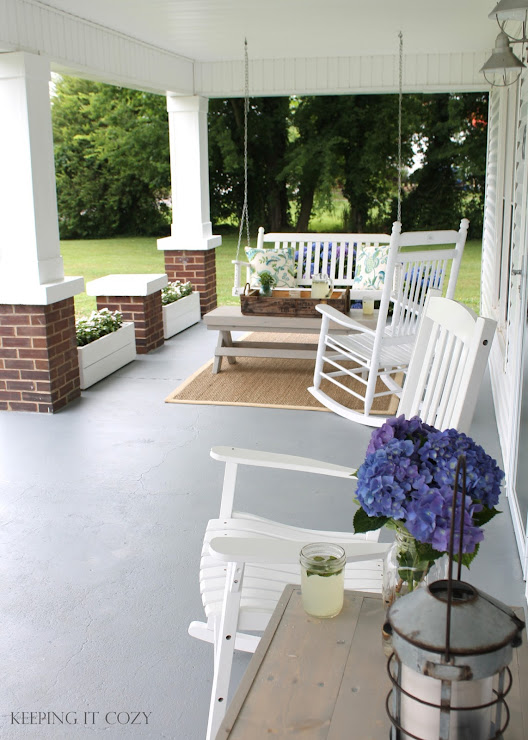
 The biggest transformation was building square columns on the porch.  Justus and I have wanted to do this since the day we moved in, but as it always go, we've had to prioritize.  The columns completely transformed the look of our house... it was so exciting to see the exterior come together.  Justus actually just framed around the existing columns and then it was time to use wood filler, caulk and paint.  (The UPS man probably thinks I'm crazy as he drove by three days in a row last week while I was still puttying and sanding.)   I mentioned in an earlier post that we also removed the shutters and it instantly gave the front porch such an open feeling. 


 Our front porch is huge, so I really wanted to focus on creating a couple different seating areas that would invite somebody to sit down and relax. 


 Justus gave me the swing a couple years ago as a birthday gift but I've always thought how nice it would be to have a place to prop feet.  So I came up with a basic design and asked (okay, begged) Justus if he would build us a couple pieces of matching furniture for the porch. 


 I love what he came up with.  Once he finished building, I stained the pine and sealed it.  I wanted something that was simple, yet had that farmhouse plank appeal.  

The coffee table also doubles as a bench if we ever need extra seating.  


 The "tray" on the coffee table is an old box (from the 1950s) that my father-in-law had... he gave me a few of them and on this one I removed the lid to convert it into a tray we could use outdoors.  The rope handles are just perfect.

To complete this seating area, I added a natural seagrass rug and some outdoor pillows from Lamps Plus


 We still have the same four flower planters we built last summer and right now they're packed with Vinca (my favorite annual for shade).  

In the background you can see our chicken house. 


 On the opposite side of the porch, I created another seating area, but this one had to allow for a walkway as the driveway is to the right of the porch (you can vaguely see the gravel in this picture) and we come up on this side of the porch. 

Justus also built this side table and it has the same design as the coffee table.  I really wanted a little table here so there was a space to set down drinks, etc. 


And of course there had to be room for accessories, like a lantern (smile)! 


This is the Mini Penny hydrangea I recently planted... I love its pale pink blooms. 


 I also gave the front porch a fresh coat of paint.  It's just a shade darker than what it had been.


 These light fixtures are really what inspired the entire look of the porch and prompted me to go with soft grays... I love how the nickel color gives such a light, fresh feeling. 


If you missed the post about our front door makeover, you can catch up here


Thanks for reading... I hope I haven't bombarded you with pictures!  If you have any questions, feel free to ask (smile)! 


P.S.  You may have noticed that somebody had a lot of fun running back and forth sampling the lemonade while I was taking pictures!  

Porch Posts:
Porch Planning here
The Front Door here 

Source List:

Door Paint: Benjamin Moore Essex Green Semi-Gloss
Porch Paint: Valspar Satin Porch & Floor Paint Light Gray 
Column Paint: Martin Senour Great Life Exterior Bright White Semi-Gloss
Furniture Stain: Rust-Oleum Ultimate Wood Stain Sunbleached
Furniture Sealer: Satin Polyurethane
Door Hardware: Rust-Oleum Universal Titanium Spray Paint
Porch Rockers: Cracker Barrel and Wal-Mart
Porch Swing: Purchased locally and made by a craftsman in Nashville

A huge thank you to Lamps Plus for providing me with all their fabulous outdoor decor items!

Saturday, June 22, 2013

Garden Greens


 It seems like it's officially summer when we get to bring in a bowlful of veggies every day from the garden.  A little bowl, but a bowlful nonetheless! 

Right now we're enjoying everything green: zucchini, cucumbers, lettuce and green beans. 


 I had forgotten I had planted a bush bean that has yellow pods... when I noticed I had beans, I did a double take when I saw they were yellow (smile).  They're called a Golden Wax Bush Bean and they are so delicious. 


I'm anxious to show you our entire garden and share a little more about the heirloom seeds I planted, but right now it's a sight that just about has me running screaming... since I've been spending every spare minute on our front porch, the garden is showing its neglect in the form of weeds!  (We finished the porch today though... can't wait to show it to you!!)


I snapped this picture yesterday as I was cooking dinner.  I looked over at the kitchen table and both girls were helping with the beans while talking away.  My heart melted! 

Happy Summer to you! 


Thursday, June 20, 2013

Kitchen Update: The Sink Area


 About a month ago we refinished our vintage cast iron sink that is original to our house and installed a new faucet. 


 We've had refinishing our kitchen sink on our to-do list for a good while now, but getting a new faucet was the perfect motivation to get it done!

BEFORE:


Surprisingly, our sink was in great condition, but there were a couple chips and some scratches in the porcelain.  We used a Rust-Oleum Specialty Tub & Tile Refinishing Kit in white, which I have to admit I was very nervous about because we had never done anything like this.  UPDATE: I DO NOT RECOMMEND THIS PRODUCT.  IT HAS NOT STOOD UP TO THE WATER USAGE AND WILL CHIP AND FLAKE OFF.   The product needs to cure for three days, so we refinished the sink before a weekend trip out of town.  We followed the directions on the box and it actually went pretty smoothly, although it did take a couple hours.  I was glad we did it when the girls were in bed because the smell was very strong and although not impossible to do alone, the two of us worked together on it the entire time.  Believe it or not, the prep work actually took longer than the actual painting. 

AFTER:


 This is what it looked like the next day... shiny and like brand new!  It was pretty exciting.  Although dry, it was slightly tacky... three days later when we arrived home, it had completely cured. 

I have to admit that I was so, so nervous to put anything in the sink.  I purposely waited this long to tell you about the product, because I wanted to see how it would stand up.  So now I'll give you my honest opinion... although it's not perfect, I would use this product again in a heartbeat.  I love the fact that I can refinish my sink affordably and easily.  But I will also tell you I am a lot more cautious than if I had a stainless steel sink... I never place cast iron skillets in the sink and I am careful with hot saucepans.  However, so far there has not been anything that I cannot buff out.  I also don't think there are any guarantees that the coating will not chip if hit hard enough, but that was the case for me beforehand anyway.


While we were at it, Justus also replaced all the sink drain parts with new.  That turned out to be the most difficult part about the entire job!

Okay, too funny.. I just noticed that although I cleaned the sink really good before taking pictures, there's a piece of lettuce in the sink drain.  I thought about removing the picture, but then realized you would understand.  So just in case you were ever wondering, I'm just a real person that has lettuce stuck in her drain more often than not (smile)!  


 More exciting than anything was installing the new faucet that Pfister so kindly sent me.  This faucet is called the Ashfield and I fell in love with it the second I saw it.  This is a three-hole faucet, but I purchased separately a hand soap dispenser from the same line to fill our fourth hole in the sink.  When I received the faucet, I was once again shocked by how durable and well-made it looked and felt. 


I knew its vintage design would be the perfect compliment to our sink and the brushed nickel finish keeps it from looking too fancy in our simple kitchen.  I love that the handles match the antique hand pump on our old well outside.  (By the way, it looks like the handles go up and down, but they actually turn.) 


 The one thing I was worried about turned out to be my favorite part.  Never having had a pull-down faucet, I had no idea what to expect.  It toggles between spray and stream modes and the spout swivels even when it's not completely pulled down.  It is awesome... I use it constantly while washing dishes.  The spout looked a little bulky to me at first, but now I like its industrial look. 


In other kitchen news, we have a huge slab of butcher block countertop sitting in our living room to be installed next to the refrigerator cabinet.  It's exciting, but I do admit to already missing my farmhouse table where I sit and each breakfast each morning (smile).

(Update: To see the finished kitchen, click here.)


I hope you have a wonderful weekend!  

Sunday, June 16, 2013

Porch Update: The Front Door


Hi there... I hope you have had a wonderful Father's Day!  I thought I'd give you a little update on our front porch progress.  We're not quite to the fun decorating stage yet, but we're getting a lot closer! 


 The porch remodel has actually been a lot of work, but it's exciting to see it shape into something that is more our style and hopefully more fitting for our house.

BEFORE


AFTER


You can probably get a better view in the first photo above, but the very first thing I did was tear off the shutters.  I know it's a little shocking, since it does give a much simpler look, but they were non-functional and certainly not original to the house.  I love how it opened up the porch. 


Next we replaced the light fixtures with these energy efficient lights that Lamps Plus sent.  I spent a lot of time deciding what color scheme I wanted to go with... I alternated back and forth between nickel and black, but in the end, I felt nickel was the best choice, especially with our nickel colored barn lights in the back.  These light fixtures are very lightweight and let off a surprising amount of light. 

Justus actually rewired to accommodate these fixtures... it's hard to tell in this picture, but he lowered them a good few inches so that they were more in proportion with the door frame. 


 One of the biggest changes for me was painting our front door because it has always been a bright red.  I wavered between black, green and gray and then after being inspired by this picture, realized I could bring in a dark color that would still be in the green family.  I loved the idea of a color that would match our green metal roof, but wouldn't be the exact same shade.  I went to our local Benjamin Moore store, picked up this swatch and knew it was perfect.  The color is Essex Green (semi-gloss, exterior).  

Our front door is original, including the wavy glass.  We have a storm door as well, which had gold hardware.  After reading about Rust-Oleum's Universal Hammered spray paint here, I found it in the color Titanium at our hardware store and set out to spray paint the door hardware to match the nickel lights.  And once again was reminded why I'm terrified of spray paint... I have never once had a successful spray paint story (user error).  It stuck, it chipped, you name it... it had to removed with paint thinner and then I let the expert (Justus) spray them the second time around!  It was a great, affordable way of changing out the color though.


 This weekend I finally picked up a plant for the round galvanized tub from Lamps Plus that I chose to use as a planter.  And now here's a confession... instead of the tub sitting, I've been using it for every imaginable thing around our place.  My most favorite thing to use it for is weeding in the garden... the handles are so sturdy and it's just a perfect all-around size.  So I think I'm going to have to order another because I've already been missing it (smile).  

I planted a Mini Penny hydrangea in the tub, which is a compact hydrangea that is re-blooming.


I also spray-painted the number plate beside our door and then this weekend gave the siding a good cleaning.  I'll be giving the porch floor a fresh coat of paint this week, but it will remain light gray. 


 The other side of the porch is still a construction zone.  We're framing in the columns so they are square, and I am so, so excited.  Justus made some great progress this weekend though and I've been working behind him with wood putty (smile). 


Happy Father's Day! 

Copyright @ Keeping It Cozy. Blog Design by KotrynaBassDesign