Sunday, April 29, 2012

Adding to a Collection


Hi all!  It's hard to believe another weekend is at its end.

My neighbor gave me this peony blossom yesterday.  Isn't it beautiful?  And so fragrant... one blossom alone perfumes an entire room.

This weekend was beautiful and I spent as much time as I could outside weeding the garden and doing some sprucing up.  But Saturday morning my mom and I were able to sneak away with the girls for a couple hours.  We went into town to the square and walked around some antique stores and had lunch together.  It was such fun.  

We saw some great things but for the most part I was able to resist.


 However, the second I found this half-gallon size canning jar for $7, I knew it was coming home with me.  It's funny how collections sometimes start... I never planned on collecting Ball blue jars, but somehow I'm always on the lookout for more. 

What did you do this weekend?

Thursday, April 26, 2012

Refinishing an Antique Chair


 About a month ago my in-laws came to visit for the day and when they arrived my father-in-law hauled an old antique chair out of the trunk of their car.  I was instantly smitten.  I'm not sure if he had intended to or if he just felt bad since I kept sighing over it, but he gave the chair to me.

 The chair was sadly in need of some TLC but I didn't have the time then so the chair went up to our dark cave (otherwise known as the upstairs-currently-being-renovated).  I finally had some time this week to work on it.  I've never refinished an antique piece without painting it so I'm not sure if I've done it correctly, but I love the way it turned out.

BEFORE:


As usual, I didn't take a very good "before" picture, but you can see the chair was dirty, scratched and worn.  The back of the chair was caned, but sadly it had been punctured in a couple places.


I dragged the chair outside for a good cleaning and some sanding and oh boy, was I nervous.  But it had worn so much in some places it was splintering.


Once I finished sanding, I put one coat of a pecan colored stain on.  We liked the contrast of the two tones so I chose to go light on the stain.  I finished by rubbing on some Annie Sloan wax. 


I wasn't sure what to do about the caning so I consulted my favorite furniture expert, Miss Mustard Seed.  I read her post about refinishing a cane-backed chair with some drop cloth and a piece of trim.  And fortunately I just happened to have some drop cloth on hand.  I stapled it on and then glued on some trim I found at the fabric store.


Isn't she pretty?  The best part is that the chair is completely functional and surprisingly very comfortable.  The seat height and back are adjustable. 


 On the back of the chair I simply glued a piece of drop cloth over the cane.  (I did iron and fold the drop cloth beforehand so that the edges looked finished.)


While I was cleaning the chair, I noticed a couple metal plates.  One had a serial number and the other identified the name of the chair company.  Turns out the chair was made by the B.L. Marble Chair Company.  I did a little google searching and enjoyed reading a little about the history of this chair company.  I also read in one place that the bottom of the chair would have productions details either written in chalk or on a piece of paper.  I found the piece of paper but unfortunately it disintegrated the second I touched it.  I also found an engraved marking that identified the wood as birch.


I'm not sure how old this chair is, but I think its worn character fits just perfectly in our home and now I'm on the lookout for another chair to complement it.  By the way, my father-in-law only paid $15 for this chair... I'm not sure of the value of this chair, but I'm pretty sure that was a steal!

Sunday, April 22, 2012

A Princess Party


Our little girl turned four on Friday.  I can hardly believe the past four years have gone so quickly, but I've enjoyed every stage and loved every minute.  Jillian is my sweet little helper and my constant companion.  I hope and pray we're always close.

My mom made Jillian this precious Cinderella dress specifically for her party.  I can't even tell you how excited she was to wear it for the first time!


 This year Jillian insisted on a princess party and I admit I was a little reluctant simply because I didn't want it to look like it had come out of a Disney book.  Then I realized it didn't have to... I could still incorporate princess colors like blue and pink but I could give it a bit of a shabby-farmhouse feel.  I was particularly inspired by this beautiful shabby chic princess party.

My mom and I love planning parties.  We've thrown several parties during the past years, between showers, lunches and now birthday parties.  And we're a pretty good team... I try to take the brunt of the work when it comes to birthday parties but I don't know what I would do without her help and her creativity.  

My mom designed and made the invitations and I simply love them.  I went to Hobby Lobby and picked out four different papers, which to me sets the entire tone for the party. 


After Jillian and I made pinwheels recently I realized how easy, fun and pretty they were.  I could make four pinwheels per sheet of paper.  I literally made all of the pinwheels for the party in just an hour one evening.  


 The party was planned for outside.  We've had absolutely gorgeous weather for the past month and this week in April has always been beautiful for as long as I can remember.  But this year was the exception... we set up tents, tables, chairs, decorated the porch, hung pinwheels from the tents, and tried to pretend our fingers weren't frozen.  

But an hour before the party we finally admitted it was absolutely freezing and there just wasn't any way we could expect people to stay outside.  So we scrambled to move the party inside... which wouldn't have been a problem, except we don't exactly have a large house and we were expecting around 40 people!

Once everyone arrived we were crowded and cozy, but I don't think anybody minded because we were also warm.  And I've always tried to have a flexible attitude when it comes to parties, because let's face it, they never seem to go completely as planned.  (I had to adopt this attitude on my wedding day when my husband had food poisoning and barely made it to our wedding!) 


 I placed the pinwheels in jars and put them on the tables as centerpieces along with some fresh flowers.  I hung some of my favorite pictures of Jillian from this past year on an old window frame with twine.


 I had some leftover paper and I've been wanting to try a tutorial I saw for paper flowers.  This paper bouquet was a blast to make and so pretty!


 I wish you could see how pretty Jillian's birthday banner was.  However, the wind was whipping and I only managed a couple shots.  My mom made it and she said it didn't take her any time with her Cricut machine. 


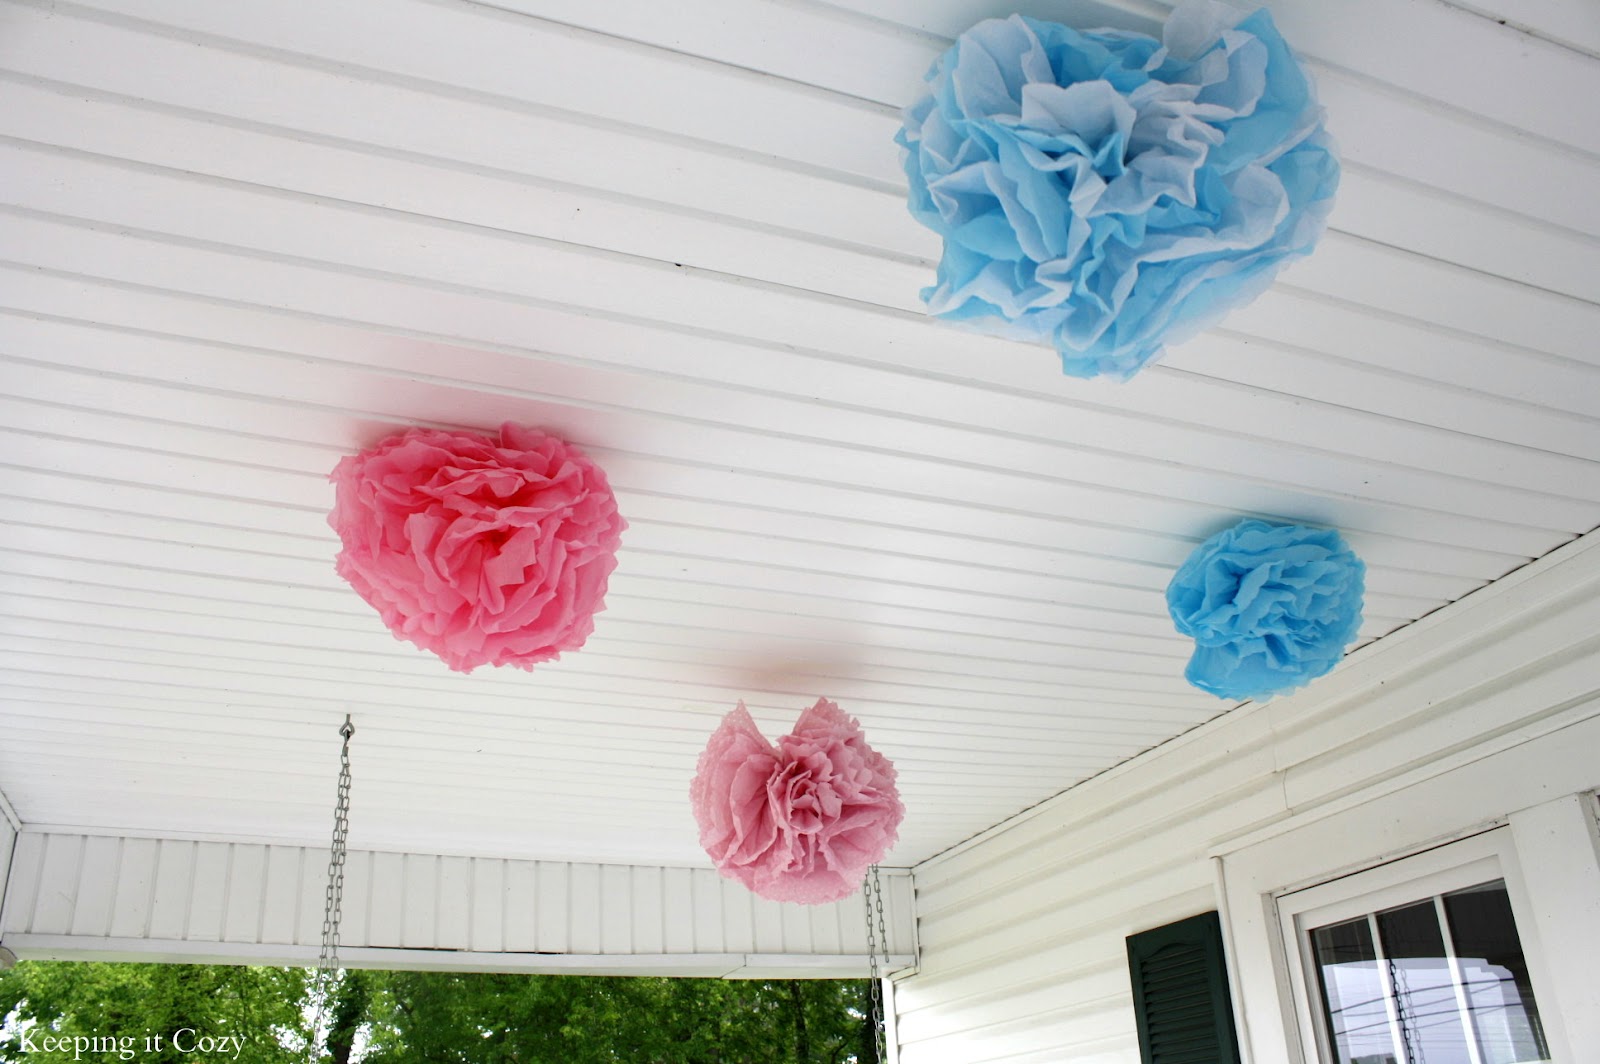
We also hung tissue pom-poms from the porch ceiling.  (My original plan was to have the drinks, gifts, etc. on the porch.)


 A few more pictures of birthday decor (you can see the banner a little better here).


 Since we were expecting a crowd I made a sheet cake.  I used my very favorite Strawberry Shortcake Cake recipe from Pioneer Woman, but I doubled the recipe and made a sheet cake instead of a round cake.  Delicious! 


I kept the menu very simple and I prepared almost everything the day before.

Cheese Ring with Strawberry Preserves and Crackers
Fruit Skewers with Dip
Chicken-Tortellini Salad
Mango Salad
Fried Chicken Bites with Honey Mustard Dip

For drinks we had water and cherry limeades.  We used canning jars as drinking glasses.


Favors for the adults consisted of sugar cookies shaped like princess dresses and I raided the Easter clearance aisle at Target for the kids.  (The adorable felt baskets were on clearance for 30 cents!)


Even though we had to party indoors, we still had a wonderful time and Jillian loved every minute.  

I love planning parties and this was no exception, but I did breathe a huge sigh of relief yesterday evening.  (smile)

Thursday, April 19, 2012

Balsamic Strawberries


Strawberry season is here.  Just another reason I love springtime so much.

I made these balsamic strawberries for dinner the other night and they were delicious.  So sweet they were practically dessert!

Balsamic Strawberries
From: Southern Living

2 cups sliced fresh strawberries
1/4 cup sugar
4 teaspoons balsamic vinegar

Stir ingredients together and let stand 1 hour.

Wednesday, April 18, 2012

Remodelaholic Feature


I am so excited to share today that our kitchen and reclaimed wood butcher block countertops are being featured on Remodelaholic.  

Have you ever visited Remodelaholic?  If not, you must.  It is a blog all about DIY and I never leave without being completely inspired.  Not only do Justin and Cassity share some fabulous projects from their own home, but they also feature projects from their readers.  What I particularly appreciate is that Justin and Cassity do everything on a very tight budget... in fact, their motto is reduce, reuse, recycle, re-purpose, and remodel.


Although our kitchen is not perfect, I'm so excited this remodel project is being featured as our kitchen is my favorite room and we've worked hard to make its character shine.  It's where I spend a good majority of my time and the country sunshine coming through the windows always makes me happy. 

If you are visiting from Remodelaholic, I am so glad you stopped by.  I hope you'll be back!


 Thank you Justin and Cassity from Remodelaholic for featuring our kitchen today!

And thank you all for reading... I hope you have a wonderful day. 

Monday, April 16, 2012

A Kitchen Garden


A couple weeks ago I planted my first garden at our country home.  I've had a garden only once before - a small raised bed at our previous house - so this was a new experience for me.  I know very little about gardening except from the little I've read and the questions I've asked.  But I'm hoping to learn.


We selected a spot in our yard close to our back deck.  I like the term "kitchen garden" and I feel like this accurately represents our garden because it's the first thing I see when I look out our kitchen window and it's also very convenient to quickly run out for something while cooking. 

(Do you see the patch of dirt?  This is nothing... right now it looks like our entire property is dirt!  We've been doing some extensive work outside, including bringing in dirt to raise the areas beside our house.  Hopefully in the next couple of years we will have nothing but beautiful grass!)


Our garden size is approximately 22 x 22.  I drew up a plot map so I knew exactly where everything should go.  I stuck this plan away with all of the seed packets so I can refer back to it if needed.  


Then we rototilled and prepped the soil for planting. 


A few days later on a beautiful Saturday morning Jillian, Rosetta and I went outside and planted.  It was so sweet having Jillian at an age where she could actually help me plant and dig holes.  

After planting (and while the girls were napping), I laid out pine straw between the rows.  And then I just stood there wondering how it would be possible for those little seeds to grow.  I was so sure that I would do something wrong and nothing would come up.


 But then this weekend I went outside to do some work and noticed I had a little cucumber sprout.  It was hard to imagine how a little seed could grow into something that would bring forth something so delicious.  A miracle...

And now just a couple days later my entire garden is covered in little sprouts.  It feels rewarding, not only for myself but also for Jillian.

In addition to planting seeds, I also bought some mature plants. 


Lavender.


 Mint.


 Several tomatoes (I hope to have plenty to can this summer).


 And some fresh herbs, like rosemary, which I've already been enjoying.


In addition to planting a garden this year, we also wanted to add some fruit bushes and trees.  When we made a trip to our new local home improvement store, I was so excited to see these mature blueberry bushes that came from a neighboring state.  


They already had little berries forming.  


 Our other weekend purchase was a swing for Rosetta.  You may have noticed that the swing-set is conveniently located right next to the garden.  The girls swung and swung this weekend while we worked around the yard.  Jillian loved pushing her little sister and Rosetta was all smiles.

Sweet springtime gardening fun!


Thursday, April 12, 2012

Homemade Chicken Stock


Several months ago I started making my own chicken stock.  You're probably thinking, who has time to make their own chicken stock?  That's exactly what I used to think, but one day I decided to give it a try and since then I haven't been able to go back to buying canned chicken stock at the grocery store. Homemade chicken stock is more flavorful, healthier and cheaper.   


 Making chicken stock is as easy as pulling a few ingredients out of your refrigerator and pantry and throwing it in a pot with a chicken.  I almost always have some veggies that need used up and chicken stock is the perfect place to use them.  In this case, I had 1/2 onion and some baby carrots that were getting old.  I used fresh herbs from my garden, but I've used dried before if I don't have fresh on hand.  Chicken stock can be made with very few ingredients, but today I used:

- a large handful of baby carrots
- 2 ribs of celery, snapped apart 
- 1/2 onion
- 3 sprigs parsley
- 3 sprigs thyme
- 1 tsp black peppercorns
- 1 bay leaf
- 1 tsp kosher salt
- 1 whole chicken, washed


I always try to purchase either an organic or cage-free chicken.  The better your chicken, the better your stock and that's a tried and true statement!   (smile) 


Put all of the ingredients into a large pot, cover with water and bring to a boil over high heat.  Turn the heat down and simmer until fully cooked (about an hour).   (I rotate my chicken at least once during this time to ensure even cooking.) 


 While the chicken is cooking, I take care of other things.  Today I had time to catch up on dishes, prepare the ingredients for chicken salad for lunch and put supper in the crock pot. 


Remove your chicken, set aside to cool and then strain your broth.  


I always use my discarded carrots for baby food.  Now that Rosetta is getting older though, I don't have to grind them up anymore.  (I can't figure out how it is possible that she is already 9 months old!)  


 Delicious broth.  This yields about 11 cups. 


I pour 2 cups of broth into Ziploc bags and freeze (up to 6 months).  (Another benefit to making your own stock is that you are no longer exposed to the hazards of BPA often found in the lining of cans.  And while some storage bags contain BPA, the Ziploc brand does not.) 


Now you can shred your chicken.  I always make a chicken salad with half of the shredded chicken and then freeze the rest for another meal.  (My very favorite chicken salad recipe comes from Southern Living.  All I do different is add some grapes.  Recipe below.)

I love having a freezer full of chicken stock.  Chicken stock is something I use very often and I highly recommend giving it a try!  It is positively delicious to use when making soup.

Also, for fun I did a little cost comparison.  

I spent $7 on my all-natural chicken.  From that chicken I got about 4 cups of shredded meat (enough for 2 meals) and 11 cups of chicken broth.  

If I had purchased 11 cups of brand-name broth at the store it would have cost me roughly $7.50 for the broth alone.  

Hope you enjoy! 

Cathedral Chicken Salad
From: Southern Living
 
Ingredients
  • 1/2 cup mayonnaise
  • 1 tablespoon fresh lemon juice
  • 2 teaspoons Dijon mustard
  • 1/2 teaspoon ground white pepper
  • 1/2 teaspoon seasoning salt
  • 3 cups chopped cooked chicken
  • 1/2 cup chopped celery
Preparation
  1. Stir together first 5 ingredients until blended.
  2. Place chicken and celery in a large bowl; add mayonnaise mixture, and toss to combine.


Copyright @ Keeping It Cozy. Blog Design by KotrynaBassDesign