Saturday, March 31, 2012

It's a Date: Bunny Tail Lemon Cupcakes and Pinwheels


A while back I had a special evening where just Jillian and I spent time together making a fun dessert and working on a craft after Rosetta went to bed.  We had such a great time that I've tried to make it a weekly event.  With the upcoming Easter holiday, our "date night" has been, of course, themed.  Last week we made Easter nest treats and dyed eggs.  This week bunny tail lemon cupcakes and pinwheels were on the agenda!


The lemon cupcakes we made were so delicious I actually plan on making them for Jillian's 4th birthday party next month.  I try to set all the ingredients out so it's easy for Jillian to pour and stir.  (smile)  She loves to help me cook and I know it's rewarding when she feels like she made something all by herself.  


The recipe called for creating the bunny tails out of cotton candy, which is a fabulous idea, except I didn't have any.  That night I tried to come up with something to use and then decided quilt batting would be perfect (although certainly not edible - ha!).  This morning we finished the cupcakes by adding the tails.


Recipe listed below... you must try these!  The hint of lemon is just perfect for springtime.


While the cupcakes were baking, we made pinwheels.  I can't remember the last time I made a pinwheel, so I had to do a little searching for instructions, but it was pretty easy.  Fold, punch, cut, clasp.  


We really had a fun time making the pinwheels.  I had to help Jillian with these but she did all of the cutting herself!  The pinwheels aren't perfect but they turned out so cute.  We attached dowels to some of them and then created a pinwheel garland with the rest.


 We hung the garland in the playroom window.  Cheerful springtime decor! 


Jillian and I both look forward to spending time together and doing something a little special.  It's good for me to take a break from the busyness of life to enjoy some one-on-one time with my precious daughter.  

I wanted to share our evening since the cupcake recipe is a keeper and the pinwheels would be so cute for parties, Easter baskets, you name it!

Bunny Tail Lemon Cupcakes Recipe
Recipe from: Pottery Barn Kids
Ingredients - Cupcakes
  • 1/2 cup (1 stick) unsalted butter, room temperature
  • 3/4 cup sugar
  • 2 eggs
  • Zest of 1 lemon (about 2 tsp.)
  • 1 tsp. fresh lemon juice
  • 1/2 tsp. vanilla extract
  • 1 1/2 cups all-purpose flour
  • 1 1/2 tsp. baking powder
  • 1/4 tsp. salt
  • 1/2 cup milk
  • Lemon Buttercream Frosting (See below)
  • Additional Decorations
  • 12 skewers, 6" each
  • 1 bag plain white cotton candy
Preparation
  • Preheat the oven to 350° F. Prepare a cupcake tin with 12 liners.
  • Combine the butter and sugar in the bowl of a stand mixer. Using the paddle attachment, cream the butter and sugar until light in texture, about 2-3 minutes. Add the eggs one at a time and beat until incorporated, scraping down the sides if necessary. Add the lemon zest, juice and vanilla, beating one more time to incorporate.
  • Sift together the flour, baking powder and salt. Add half the flour mixture and half the milk to the sugar mixture and blend just until combined. Scrape down the sides, then add the remaining flour and milk and mix until the batter comes together uniformly.
  • Divide the batter evenly among the cupcake liners, filling each about 3/4 full. Bake on the middle rack of the oven for approximately 20 minutes. Cupcakes should be firm but springy to the touch and slightly golden on top. Allow to cool completely before frosting.
  • Frost each cupcake with a generous amount of the buttercream. Place a skewer in the center of each cupcake, then top with a 2-inch piece of cotton candy. Repeat with the remaining cupcakes.
Ingredients - Frosting
  • 1 cup (2 sticks) unsalted butter, softened
  • 2 cups confectioner's sugar
  • Zest of 1 lemon
  • 1 Tb. lemon juice
  • 1 Tb. milk, plus more to taste
  • 1/4 tsp. vanilla
  • Pinch of salt
Preparation
  • In the bowl of a stand mixer fitted with the whisk attachment, cream the butter on medium speed until light and fluffy, scraping down the sides if necessary. Add 1 cup of the confectioner's sugar, the zest and the lemon juice. Beat on medium speed until combined. Add the additional cup of confectioner's sugar, the milk, the vanilla and a pinch of salt. Beat again until smooth. Taste, adding more confectioner's sugar or a little more milk to reach the desired sweetness and consistency.
Yield: 12 cupcakes with about 2 cups of frosting

Thursday, March 29, 2012

Spring Deck Redo


NOTE: I DO NOT RECOMMEND THE DECK RESTORE PRODUCT WE USED.  AS TIME PASSED, IT DESTROYED OUR DECK.  PLEASE DO NOT PURCHASE!  

I was really hesitant to write this post... there are so many yards out there that are amazing and we still have so much work to do.  But with that being said, it's hard not to share since all of our efforts have been going to our home's exterior.  The past couple years, since moving, we haven't been able to devote any time to outdoor renovations, but this spring we have been putting all of our extra time (and house repair budgeting) to the outside of our home.

BEFORE:


First on our mile long list was renovating our back deck.  Above is a picture of how our deck previously looked.  (Sad, but true.)   The first thing we did this month was remove the old lattice, move the railroad ties, and pull up miscellaneous bushes and weeds (not to mention some very icky weed fabric and trash under the deck from the previous owners).


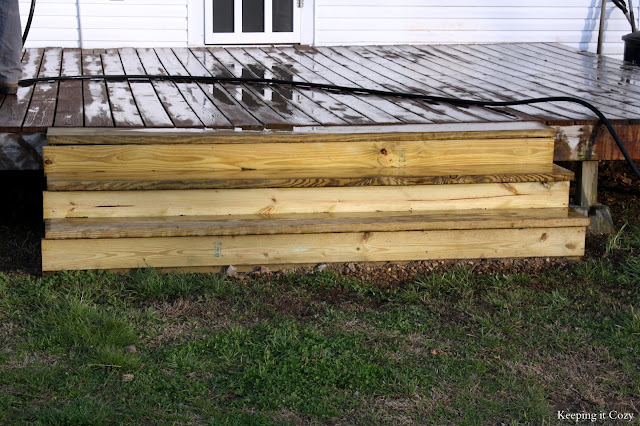
 Next Justus ripped out the old rotting steps and built these larger ones.  He centered it on the porch, which works so much better.  I can't tell you how much time we spend just sitting on the stairs of our back deck when the weather is nice. 


 Fortunately, the wood on the deck itself was still good, but the stain was wearing and there were splinters everywhere.  Justus found a product specifically for this type of problem.  It's called Deck Restore.  (PLEASE NOTE: I DO NOT RECOMMEND THIS PRODUCT.)  We bought it at Lowe's and it revives and protects wood surfaces.  You can purchase it in a variety of colors, but we chose Cape Cod Gray because we felt it matched our house best.


The paint covers up to 1/4" cracks and eliminates any splinters, but you have to spread it on thick.  Unfortunately we didn't realize until we brought the first couple gallons of paint home that one gallon only covers 50 sq. feet.  So although this is more cost efficient than replacing all of the wood, it was still costly... we had to purchase 7 gallons total.  Despite that, it was totally worth it.  Regular paint would not have hid imperfections.  


We only painted the stair treads with the Deck Restore to save some money.  Since the stairs are new, we didn't need to fill in any cracks or hide any imperfections.  I painted the sides of the stairs and the side of the porch where the lattice is with regular latex paint tinted to match the Deck Restore.

You can see in the picture above that we also put up new vinyl lattice. 


I visited our local nursery over the weekend and purchased two Annabelle hydrangea bushes to plant on either side of the stairs.  I love hydrangeas and I thought white blossoms would be so pretty here.

BEFORE:


 The only thing we did prior to this month was replace our back door.  This screen door was very outdated but I realized quickly when we went door shopping why it was still there.  Because the back of our house was originally a porch (before there was such a thing as indoor plumbing and kitchens), the door height is smaller than what you find now in stock.

AFTER:


Fortunately Justus is super handy and he was able to take the above door and customize it by taking it apart and rebuilding.  We also replaced the light fixture with this affordable beauty from Lowe's.   


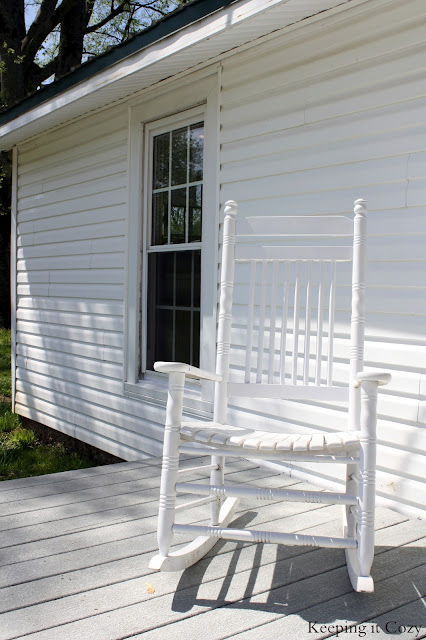
 I took one of our rockers from the front porch, gave it a coat of fresh paint and put it on the back deck. 


 What you can't see in the picture above is that we also have a wooden patio table that needs refinishing,but we hope to get to that soon!  Once we do, I know we'll be eating many meals out here in the evenings. 


 We still have so many improvements to make outside, but it sure felt good to cross out this deck on our list!  

This week we rototilled our garden (can't wait to start planting) and moved some dirt in preparation for moving our driveway.  The gravel should be delivered Friday so we hope to have that completed this weekend!

What are you working on outside? I'd love to hear!

Monday, March 26, 2012

Ball Blue Canning Jars


 This weekend we made a quick visit to our local antique mall and while there I admired these old blue canning jars made by Ball.  Later that afternoon I was cleaning our dining room and suddenly realized how pretty the blue jars would look there.  I don't do this often, but when the girls woke up from their nap, we actually piled back in the car so that I could go back and buy these jars!


Since then I had fun doing a little reading on old Ball canning jars and learning how to "date" them.  This particular blue glass was discontinued around 1937 and was caused from the minerals used in the sand and the amount of oxygen used in their furnaces.  The jars I purchased have the writing "Perfect Mason" on them, which began appearing around the year 1913.  You can see that in the picture above the Ball logos are actually different.  From the little research I did, I believe the jar on the left would have been made somewhere between the years 1923-1933 whereas the jar on the right was made between 1910-1923. 


 On the bottom of the jar is a circle surrounding a number.  The circle is actually one way of determining whether or not you have an authentic jar - apparently it is an indicator of whether or not the jar was manufactured on an Owens machine, which was used before more modern machines. I've always wondered what the number on the bottom of the jars mean; however, apparently it was only used as a mould identifier. 


 I placed the three jars on top of the piano where I had a large empty place waiting for something... anything... to take residence!  (smile)


 They just seem to add a small touch of some needed blue in this corner of the dining room.


They perfectly match the dining room curtains, which is the reason I hightailed it back to the store... it's difficult to match this color.


I can't resist showing you another addition to our dining room.  We dyed some eggs with Jillian for the first time and she loved it.  (smile)

Thursday, March 22, 2012

Fabric Flower Garland Tutorial


 Earlier this week I shared some spring time decorating in our living room and I promised to share the tutorial for the fabric flower garland I made. 

Are you interested?  If so, let's make some flowers!

SUPPLY LIST:
  • 1 yard of quilting fabric with plenty left over (I wanted some variety, so I purchased 1/4 yard each of four different fabrics)
  • 1/8 yard of heavier fabric, such as drop cloth or felt (to use as backing)
  • Button cover tool set
  • Hot glue gun
  • Twine


Begin by tracing your flower outline onto the fabric.  However many petals your flower has is how many flower shapes you will need cut out.  For example, my flower had 6 petals, so I needed 6 flower shapes cut out total per flower.  For your outline, you could use a flower cookie cutter, an image printed out (like me) or even draw something freehand. 


 Cut out your flower shapes.  This part is a little time consuming, depending of course upon how many flowers you need.  I needed 6 flowers for my garland, so I had to cut out a total of 36 shapes.  


 Of course, I had my helpers along.  We spread a blanket out on the deck in the sunshine and the time passed very quickly!


In addition to the patterned fabric shapes, I also cut out one shape per flower for the backing.  I used drop cloth since I had some on hand, but felt would also work.  For the garland I made, I had a total of 42 flower shapes cut out (6 shapes for the back and 9 shapes of each pattern).


Now we're ready to assemble the flowers.

1.  Fold the shape in half.
2.  Fold it in half again.
3.  Do this for all 6 petals.
4.  Place one of the folded petals onto the backing so that the petals line up.
5.  Do this with each petal, overlapping as you go.
6. Finished and ready to sew!


I sewed a small circle around the center of my flower to secure the petals, but honestly you could probably do this with a hot glue gun if you don't own a sewing machine.


Iron the flower flat.


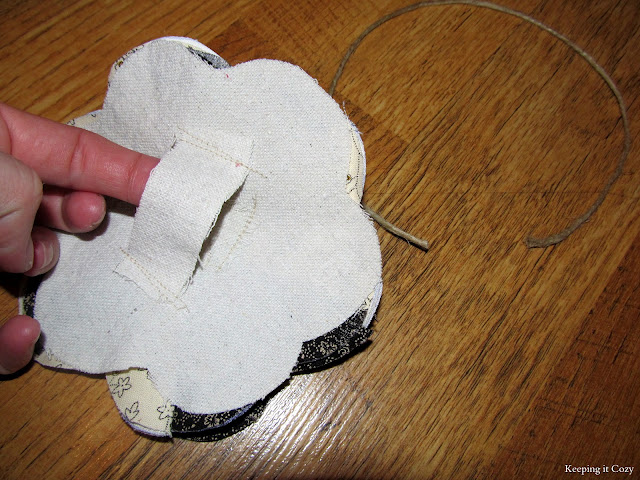
Now cut a small strip of drop cloth, or whatever backing material you are using, and sew it on the back.  This is what you will string the twine through.  You can tell I didn't care what the back of mine looked like (it was late)... I'm sure yours will look much nicer than this.  (smile)


Almost finished... it's time to cover the buttons.  Have you ever used a button cover tool kit?  I'm probably the only one who hadn't before this, but my mom recently picked up a kit for me, and wow, did I love it.  These buttons were a snap to make.


I not only glued the button onto the flower, but I also glued a small amount between the backing and quilting fabric.  This prevents it from flapping once hung.


Finished!  I created the garland by stringing two strands of twine through the back of each flower, but you could use anything.


I really had fun with this project.  I want to display my garland for a while, so I used colors that would coordinate well with the rest of the living room, but seasonal patterns would sure be fun! 


P.S.  I promised you would have extra fabric... now you have enough to make a super simple silhouette pillow!  (smile)
 
Happy Crafting!


Monday, March 19, 2012

Touches of Spring in the Living Room


This weekend I did some spring decorating in our living room.  Our mantel is my favorite thing in our living room... we actually have four mantels total downstairs! I purchased the picture above the mantel several years ago and it is still something I love.  Supposedly it was made locally with wool. 


My seasonal decorating is simple, but I like to bring in a few elements that reflect the time of the year.


The fireplace is non-working, unfortunately.  When we moved in we removed the cover and exposed the beautiful brick and an old grate.  I quickly made the rabbit silhouette pillow on the chair this weekend with some scrap fabric. 


The yellow fabric is so cheerful.


Yesterday I made this flower garland.  I've had this idea for a while and finally went to our nearby quilt store to purchase some fabric.  I'll share the tutorial later this week.  It was such a fun project and I love the dimension it adds to the mantel!


The tin hanging on the wall was the cover we removed to expose the inside of the fireplace. 


I couldn't help but cut a few more cherry blossom branches this weekend to bring into the living room.  The blossoms are so beautiful. 


The firewood racks are original to the house.  We found them buried in the shed and I gave them a fresh coat of black paint and use them in the living room to store photo albums and scrapbooks. 


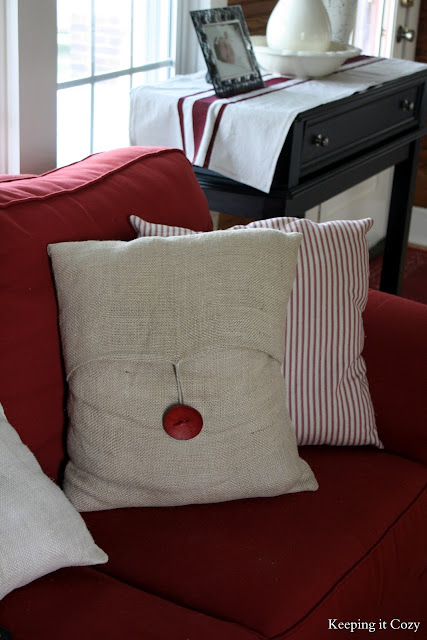
A peek of our red couch.  We've had it for years and I still love it! 


Willow branches on the entryway table.  You can make the simple painted "grain sack" runner by following this tutorial


A beautiful nest. 


I love spring time and couldn't resist decorating for the season since we are having unusually warm and beautiful days!  We spent as much time outside this weekend as possible.  The girls and I enjoyed laying in the shade listening to the birds chirping.  

Happy Spring!


Copyright @ Keeping It Cozy. Blog Design by KotrynaBassDesign