Tuesday, January 29, 2013

Baking Biscuits

 
 My husband, unlike me, is a true southerner... he was born in Tennessee and raised in Alabama.  He says "yes, ma'am" and "no, sir" and to this day adds a "Mr" and "Ms" before my parents' first names.  Like most southerners, one of his favorite foods is biscuits.  When we first married, I was convinced I could prove to him that a healthier homemade version could taste better than the biscuits that came out of a can from the refrigerated section of the grocery store.  However, that was no easy feat for me, particularly since I baked more batches than I can count that were either hard as a rock or flat as a saucer, or even worse, both.

Over the years I stubbornly kept trying again and again and tweaking ingredients and methods.  It was a happy day when I finally had a batch turn out and I think I may have worn a smile all day when my husband could honestly say that they tasted good. Since then, I guess I like to think that I have perfected them (smile). 

Sometimes I hesitate to post recipe tutorials because in all honesty you're probably the one that could teach me something!  Nevertheless, I thought I would share my biscuit recipe with you and a step-by-step tutorial of how I make them. I hope you enjoy them as much as we do!

I use three simple ingredients:
  • 1 1/2 cups unbleached Self-Rising Flour (I've been buying the King Arthur brand for years... their flour is unbleached and contains aluminum-free baking powder) + a little extra
  • 4 Tbsp Unsalted Butter 
  • 3/4 cup Buttermilk*
*Although I love the hint of buttermilk, regular milk will work just fine.  I've used it many times with equally good results, but you will need to decrease the amount to 1/2 cup.

Before baking biscuits, I bring out my "biscuit-baking" tools:
  • Pastry Blender (although I consider this a must-have inexpensive gadget, two butter knives will work also)
  • Biscuit Cutter (a round glass would also work)
  • Rolling Pin
  • Cast Iron Skillet (mine is around 12")

Preheat the oven to 450 degrees.  Measure out 1 1/2 cups of self-rising flour and pour into a large mixing bowl.  Keep your flour handy - we'll be using it again!


Cut 4 Tbsp of cold butter into small chunks and place in the bowl with the flour.


Using a pastry blender (or two butter knives) cut the butter into the flour until the butter looks like little crumbs.

For a long time I made biscuits with shortening.  However, when I cut hydrogenated oils out of our diet, I wondered if I could substitute an equal amount of butter.  What resulted was a buttery, flaky biscuit full of flavor.

Measure about 3/4 cup of buttermilk (or 1/2 cup milk) and pour into the flour/butter mixture.  

I personally use whole buttermilk which is why this is so clumpy.  I started buying milk from the nearest natural foods store and it still comes in a glass bottle... isn't that neat?


Stir the ingredients just until everything comes together.  Do not worry too much about all the flour being incorporated... we will knead it into a smooth ball soon! 


This is when I "prep" my kneading station.  I use a cutting board because it makes for easy cleanup.  Begin by sprinkling a little flour over your flat surface and keep that flour handy still.
 

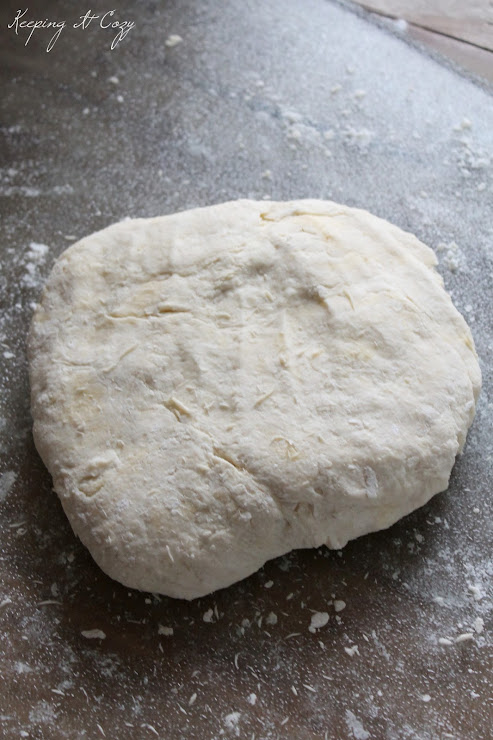
Dump the dough onto your floured surface.  You're going to start kneading it, so if the dough is sticky, sprinkle a little more flour on top.  Knead the dough until it becomes a soft ball... it won't take long.  As you knead, the dough will likely turn sticky again, so just sprinkle in a little more flour if that happens. 


You want your end result to be soft and silky, but not sticky.  Shape the dough into a round disc with your hands.

What I've learned about baking is that you have to keep at it even if you have less-than-desirable results.  So much about baking is learning the texture of your dough.  It won't be long before you will rely more on what your dough looks like and feels like than exact measurements.


Using your rolling pin, roll out the dough until you achieve a desired thickness.  We love fluffy biscuits, so I roll mine out about 3/4" thick. 

My girls looove "helping" me with biscuits Saturday mornings.  Jillian likes to help me stir and cut out the biscuits.  Rosetta, on the other hand, likes to play with the rolling pin and poke holes in the dough.


Now you're ready to cut out your biscuits!  You will have to roll out your dough again a couple more times before all the dough is used up.  If the dough is so sticky that it won't come out of the biscuit cutter, lightly pat a little flour over the top of the dough. 

See what I mean about poking holes into the dough?  (smile)


As you cut out your biscuits, place them in an ungreased cast-iron skillet.  This will result in a biscuit that is slightly crunchy on the outside with a light, buttery texture inside.  Yum!  Now pop them into the oven.


I'm going to be honest here... I don't usually leave my biscuits in the oven for a specified amount of time.  I know it will take them anywhere from 13-17 minutes and I keep an eye on them until they are just golden.  But for the sake of this post, I timed this batch and I took them out after exactly 15 minutes.  We all know oven temperatures differ, so I recommend keeping an eye on them. 


I bake biscuits every single weekend, usually on Saturday morning.  We eat a healthy breakfast of oats during the week, so this is a treat I never feel guilty about.   I love our weekly Saturday morning tradition... while my husband takes care of chores, I cook breakfast.  (Sometimes he even brings me home a latte from the coffee shop in town.)  We slather on the honey and sometimes more butter too.

These biscuits are worth the effort, although after a while I promise you won't think of it as an effort at all!


Friday, January 25, 2013

A Corner in the Living Room


 For a while now I've been gradually working on a corner in our living room.  You may remember the shelves we recently hung to give some structure to a large bare wall.  Adjacent to the wall with the shelves was yet another space I needed to fill. 

 Our living room updates have included a new ceiling, new trim, new ceiling light fixture, new drapery and fresh paint.  I've tried to keep the rest of the updates minimal and inexpensive.  With that in mind, I needed to make our existing furniture work.  After finding a furniture arrangement that I liked, I brought our originally black console table over to this wall.

BEFORE:


 I knew the right piece to hang above the table would be a mirror, so I took a trip to our local antique mall to take a look.  I found this mirror for $20.  It was heavy, obviously old with a solid wood frame and back.  I knew I would have to paint the frame so that it stood out against the wood walls, but after thinking about it for a few days, I realized it would be perfect and went back to buy it. 


 I first painted a light coat of BM Titanium (the same gray I used for the shelves), then a light coat of Annie Sloan Chalk Paint Coco, lightly sanded and finished with clear ASCP wax.  I was so pleased with how it turned out and was thrilled that my husband had to agree (especially since he tried to talk me out of buying it - smile).  

BEFORE:


The following week I went to work on our generic console table, which we purchased as newlyweds.


 The truth is... I painted too many coats on this piece to count.  I just could not get it to look right!  Finally I ended up painting BM Titanium over ASCP Coco, and finished with both ASCP dark wax and ASCP clear wax. 


 The neutral colors really pop against the wood walls and hopefully help to create a look that is soothing and cohesive.  You may have heard me mention before that the wood walls are original to our home... as hard as it has been for me to decorate this room, I really wanted to try and embrace that rustic element.


 Originally I had planned on buying a couple lamps to set on either side of the mirror, but Justus had the suggestion of buying oil lamps, and I was instantly smitten with the idea.  In our old house, we don't have many outlets and it's also nice to have a source of light when the power goes out.  I bought these nearly identical lamps at our local antique store.  All we had to do was add lamp oil - fun!


 Slowly the corner was coming together.  Then last week my dad came over and brought me some antlers he had found on their farm.  I knew immediately they would complete the look I was going for and hung them above the mirror. 


 In actuality, our sofa sits in front of the console table.  We've had this red sofa for nearly nine years (another newlywed purchase) and will likely have it for another nine (smile), so that was certainly another reason for opting to keep the background decor simple and neutral.  

Sometimes I feel like there is still so much to be done in our home, but tonight when I happened across "before" photos of our living room and our entire house, it was so rewarding to see that we actually have accomplished a lot.  Yes, there are still many improvements that need to be made, but I feel like I need to be more thankful for what we do have and recognize that it doesn't all happen overnight.  

With that being said, we're looking forward to starting on some outdoor projects tomorrow we hope to accomplish before spring, and one of those is a chicken coop!  Today was rainy and overcast (hence the bad photos), but if we see sunny skies, we'll be getting started.  

Hope you have a wonderful weekend!

Sharing at Miss Mustard Seed

Monday, January 21, 2013

New Life


 This morning a little baby was born... a little black baby calf. 


 We didn't get to see the actual birth, but we saw the baby just shortly afterwards.  My parents raise pasture-grown, grass-fed beef and they have a pasture full of pregnant mamas.  This was the first birth of the year. 


 Getting to see the little calf protected and loved by his mama and nursing for the first time was so sweet I found myself blinking back tears.  The wonder of it...


 We walked quietly away when the new baby closed her eyes and looked ready for a rest after her exciting morning. 

I just couldn't wait to share her with you.  

You can read more about the baby calf at my mom's blog here.  :-)  

Friday, January 18, 2013

A Mill Outing


 After days and days of rain, the sun came out today and I think we all jumped for joy.  All week I've been planning a little outing - me and the girls - to the mill nearby our house just as soon as it was warm enough.  But our afternoon turned out to be even more unexpectedly fun when my in-laws surprised us by driving up to visit us.  When I suggested that we all go to the mill, everyone seemed thrilled with the idea, and my parents tagged along too.  Just as we were standing in the driveway, my brother (who lives a few hours away) had decided to surprise us too and drove up!  So we all piled in our cars and headed out for a late lunch of delicious barbeque and an outing to the mill afterwards.  Our planned party of three turned into a party of nine and we had such a great afternoon that I thought I'd share a little of it with you. 


 Just fifteen minutes from our house is a family-owned mill that grinds flour, cornmeal and grits.  It's a beautiful place tucked away in the countryside complete with waterfalls, walking trails and old barns.  The mill was originally a textile factory dating back to the 1870's and for the past 30 years has operated as a grain mill.


  It's always fascinating to see the antique grain milling machinery hard at work.  We've been buying flours and grits here for a few years now... preservatives are not added to their grains and today I was pleased to learn that the mill's local wheat supplier grows his wheat organically.  I love supporting local farms and although it's so easy to go with convenience (especially with two little ones), I'm hoping to do a little better this year. 


 The girls were oh so happy to be outside today.  I don't think it mattered at all to any of us that we couldn't feel our fingers by the time we were finished... we were too busy enjoying the sunshine and fresh air.


 My favorite part of the mill is the century-old 32' water wheel which is still used to power the milling equipment.  Today was the first time I've walked behind the mill and I promised myself that I'm coming back often this spring and summer with the girls to picnic by the river. 


Rosetta was on cloud nine today getting to spend time with both sets of grandparents (smile).

I was pretty happy myself getting to spend a little time with my camera... I hadn't picked it up in almost a week! 


I came home with a bag-full of goodies, including yellow cornmeal and whole wheat flour.  I think baking bread is in the forecast for tomorrow!  

Happy Weekend!

Monday, January 14, 2013

The Story of a Dough Bowl


Today I wanted to share the story of my dough bowl with you.  You may have noticed it sitting on our living room shelves a couple posts ago... it was a very special gift from my father-in-law who recently made it by hand for me.


 I've known for a while that he was making this for me and periodically he would share his progress, but when he gave the finished bowl to me on New Year's Day, I was simply in awe.  My father-in-law is very gifted when it comes to wood-working... it's his hobby and as long as I've known him, he's always whittling on a piece of wood in his down-time, but I was still blown away. 

A more perfect dough bowl there could not be in my eyes.  It was made from a pecan tree that had been cut down about 50 years ago and is large at 2 1/2 feet long. 


When I held it for the first time, I couldn't believe how perfectly the handles fit in my hands. Instead of being a simple straight cut, you can see here how rounded they are and were carved in a downward fashion to make handling comfortable.


I love every little detail, from the worm holes in the side of the bowl to the natural cracks in the wood.


The back of the bowl is every bit as beautiful as the front and so smooth that it's hard to comprehend what it looked like originally.


 I was thrilled when my father-in-law told me he had taken some pictures of the bowl in process and when he sent them to me this week, I knew I had to share them.  You can see here the piece of pecan wood he started with. 


The hollowing was created with a spade drill bit and a grinder.


As the bowl took shape, he used a wood roughing-out tool (Scorp) to smooth the inside before sanding.


  Afterwards he sealed the bowl with food safe Watco butcher block oil.  I love how the oil slightly deepens the color of the wood and gives it a finished look and feel.


 I'm not sure where the permanent home will be for our dough bowl, but for now it's displayed with some wintery pine cones. I don't feel like I could ever say thank you enough to my father-in-law for such a special gift - it's a treasure in my eyes. 


I thought I'd share this last picture with you as it makes me laugh... I frequently use our kitchen table for taking photos because the natural light is wonderful, particularly when it's dark and rainy out like today.  When I take pictures I'm often shooting around table clutter and little hands that love to help me "style"... see the pine cone tower?  (smile)

I hope you've had a great Monday!

Thursday, January 10, 2013

Old Crocks and Silverware


Antique silverware in our kitchen is a simple pleasure I never tire of.  Displayed or in use, I find it beautiful.  Like anything old, I often wonder where it has been and in what homes it once belonged. 


I've shown you our set of matching antique silver plate flatware we use on a daily basis (here) but I also have a couple sets of mismatched antique silverware.  


 I keep both sets in small vintage crocks.  This set of silverware is unfortunately only for display and you may have noticed it before displayed on my kitchen cupboard.  I purchased this crock at an old hardware store (which also has some antiques for sale).  It was a little pricier than what I normally would pay, but I instantly fell in love with the original label still displayed and knew I would regret leaving it behind.


 The pieces inside are stunningly beautiful... I had actually forgotten about some of the intricate patterns and enjoyed taking them out again for these photos.  The majority have lovely floral patterns but sadly they are chipped in places. 


 Of course I knew this piece would come home with me when I saw the monogrammed "A" (smile). 


 My second crock I keep on our kitchen countertop and I might quickly grab a spoon when I make a cup of tea in the morning or need a fork for a snack.  This crock I purchased at a local antique store for less than ten dollars.  I knew the blue stripe would be just perfect for our kitchen.


 It's always nice to have extra serving spoons and forks and these get used often.  I never mind that they might not match my other serving utensils.  (Looking at these now, I suppose I probably should have polished them before taking photos!) 


 But my favorite pieces in this collection are two small spoons and two small forks.  I'm not sure why they are so much smaller than what you would normally see, but they are just the perfect size for a toddler that is learning how to use utensils. 


As you can imagine, these pieces I simply refer to as Rosetta's (smile).

Warm weather is in our forecast for the weekend and I am hoping the rain will stay away long enough for us to spend the majority of our Saturday outdoors, particularly as we finally beat the flu bug out of our house!

I hope you have a wonderful weekend!

Sharing at Savvy Southern Style

Copyright @ Keeping It Cozy. Blog Design by KotrynaBassDesign