Wednesday, February 29, 2012

Vintage Anthropologie: A Travel Trailer Redo

 
Last year my parents moved across the country to retire on the 100 acres of beautiful farmland they purchased 5 years ago.  The land is lush, rolling hills and has a hilltop with a spectacular view of the surrounding valley. 

Before they could enjoy the leisurely life of being retired though (smile), a house needed to built, which meant living temporarily in a travel trailer on the top of their hill. 

BEFORE:


Their travel trailer had everything they needed, but my mom, who had just left her home of 25 years, was having a hard time adjusting to her new boring, outdated living space.  So she set about making the travel trailer a warm and cozy place to be by mixing vintage and Anthropologie finds. 

Let me show you around!

THE KITCHEN


Pyrex and Fire King are just a few antique dishes that my mom has mixed with several finds from Anthropologie, like the measuring cups and measuring spoons hanging under the cabinet and a rolling pin in the corner.   One of the most dramatic changes was removing the outdated curtains that came with the trailer and replacing them with feedsack fabric curtains.

THE CORNER CABINET


With space limited, the corner TV cupboard was turned into a place to store canned goods, tea bags, and coffee.  Adhesive cork board was also placed on the back of the open cabinet to display photos of friends and family.  

THE LIVING ROOM


The view from the hilltop is amazing and this chair with a handmade quilt draped over it is a perfect place to sit and drink coffee in the morning.  A doorknob wind chime hangs in the corner. 


The sofa was draped with a denim comforter and the curtains were replaced in this area of the trailer as well using the same feedsack fabric. 

THE DINING AREA


The dining benches were recovered in denim and the table runner from Anthropologie coordinates perfectly with these bright vintage Massimo Vignelli Heller dishes.  The spoon holder is actually meant for cookbooks (also from Anthro) but works perfectly for napkins in this small space. 

THE BEDROOM


In the bedroom my mom wanted to create a space that would be slightly more masculine so my dad felt comfortable.  She selected this plaid fabric for the curtains and lumbar pillow to create a cabin feel. The cardboard covered in fabric that used to pose as a headboard was removed and she simply hung a sweet wooden sign.  The denim coverlet is from Target.

SOME OTHER FUN DECOR


Some other fun items in the travel trailer (clockwise) are antique swanky swig drinking glasses, a large lard tin canister used for a trash can, vintage tea towels, an orange enamelware coffeepot used for a utensil holder, and enamelware bowls and platters.

My sweet mom hugging my precious daughter
I love the transformation from outdated pastels to what I call "vintage Anthropologie".  My mom's style is a true reflection of her personality - warm, bright and cheerful.

I hope you enjoyed this fun tour!

Monday, February 27, 2012

A Sign of Spring


Yesterday was sunny and warm, so when my mom came over, I snuck out for a few minutes with the camera to take some pictures of these cheerful daffodils that were in bloom down the road.


I asked my husband to keep me company on my quick walk.  The only reason he agreed to this picture was because I said I needed to "test" the camera - smile. 


My mom told me recently she wanted to plant daffodil bulbs at their farm.  Amazingly enough, animals like deer and rodents don't care for the taste of these bright yellow flowers.


Daffodils grow in abundance here in the south.  They are easy to grow, come back every year, and bloom early - a sure sign that Spring is right around the corner. 

Have a wonderful week! 

Wednesday, February 22, 2012

Inside a Pantry


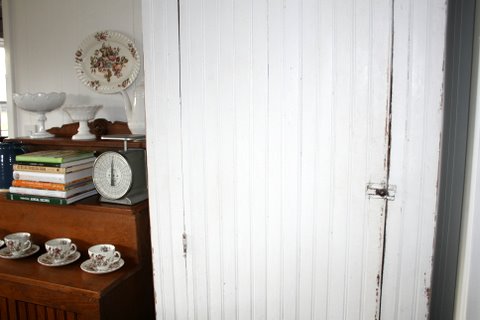
I fell in love with this old cupboard the moment I saw it. 


At the time we were living in our city house.  I didn't know where we would put it, but I knew I would find a spot!  I distinctly remember going home after seeing it in an antique store and begging my husband to not only let me buy it, but to drive the hour back to the store the next day so we could purchase it before anybody else saw what a find it was!


Little did I know at the time we would someday purchase a house in the country that had no pantry to speak of.  Not even an extra cabinet to store canned goods.  The cupboard that had been used as a wardrobe in our previous house fit perfectly in the corner of our new kitchen.  (See, it was meant for me!)


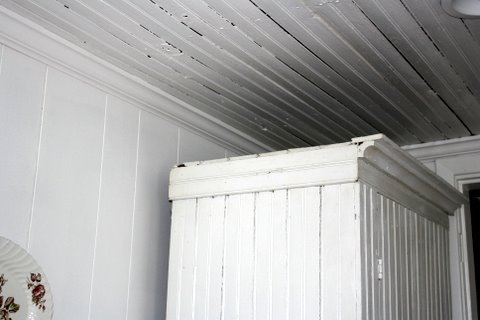
 The cupboard not only fit perfectly, but I wonder if it was made around the same era as our house.  The beadboard on the outside of the cupboard matches the original beadboard ceiling almost exactly.  (When we first moved in, this beautiful ceiling was covered with cardboard tiles... it was reminiscent of our ceiling adventure except with teal paint... another story for another time). 


I never did anything to spruce up the cupboard.  To me, it was perfect as it was, from the old paint to the original hardware.  


 The inside is simply natural wood.  All it gets is a periodic bath with soap and water.  


 However, like most pantries, it has seen some unorganized days.  This week I was flipping through the most recent Martha Food magazine and was inspired by this ad on the back cover.  I love the chalkboard labels but the nearest Staples is an hour away. Then I remembered I had some old labels that would be the perfect size, so I quickly made up some on the computer with a charcoal background to look like chalkboard. 


I made labels for anything in the pantry that wasn't easily identifiable. 


They adhered to every surface and are removable.


 Along with the addition of some needful labels, I also gave the pantry a spring cleaning. 


Organizing the canned goods in the pantry was just another reminder of how ready I am for warmer weather. 


I can't wait for fresh produce, sunshine, fireflies and evenings outside. 

Monday, February 20, 2012

Silhouette Frames

Has anybody else noticed these lovely frames in the background of a room in the Pottery Barn catalog?


My sister-in-law had a birthday coming up and I thought these would look great hanging in her library where she displays a sheet music wreath and a violin, so this picture provided the inspiration for this Silhouette Frame project.

SUPPLY LIST:


TUTORIAL:

1.  Begin by tracing your silhouette graphic with a pencil (press as hard as you can) onto the paper of your choice.  (For the silhouette I did a quick online search for my image, copied it into Word, resized and printed.)
2.  Cut out silhouette.


This is a  good time to get your kid-friendly scissors out so your toddler can work on her own cutting project (smile)...


3.  Trace your frame size onto a sheet of music paper and cut out.


4.  Adhere your silhouette to the sheet music paper with tape or glue.
5.  Assemble frame and you're finished.  Easy as can be!


I wanted to give my sister-in-law two frames that she could hang together, so I also did a butterfly and flower silhouette.


I can't wait to see how these look hanging in my brother and sister-in-law's library.  I think a matte with the frame (like Pottery Barn displayed their silhouettes) would also look really good... but it just didn't look right with this oval frame, so I opted to go without. 
 

I simply tied these together with a piece of twine to give to her.  Sweet and simple.

Thursday, February 16, 2012

Butcher Block Countertops Made Out of Reclaimed Wood


My butcher block countertops may be my favorite thing in my kitchen.  When we remodeled our kitchen last year, I told my husband that my ONE requirement was that I wanted butcher block countertops.

The only problem?  The affordable butcher block (Ikea) was 5 hours away and butcher block offered online was back-ordered up to 6 weeks.  That was when my husband asked, "Why don't I just make them?"

Lucky for me, my father-in-law had literally a pile of 100-year-old oak wood from an old chicken house.  He also had the power tools needed to build the countertops. Although power tools are needed, the process is quite simple:

1.  Find your wood.  Good, straight boards without nails that have at least a quarter inch that can be planed down would be your ideal choice.  
2.  Plane boards to your desired thickness with a planer.  
3.  Cut slats to desired widths.
4.  Place all boards in a jig that keeps it square.
5.  Glue each slat with Tight Bond wood glue.
6.  Clamp pieces together.
7.  Place weight (at least 200 lbs) on top of countertop to keep boards from pushing up.
8.  Wait at least a few days for glue to cure.
9.  Attach backsplash.
10.  Sand to desired smoothness and to sand out any glue that has pushed out through the seams.
11.  Install!

Here is a picture of the butcher block being built.  


When my husband brought the countertops home to be installed, I was blown away by how beautiful they were.  I love all the little "imperfections" in the reclaimed wood, like the worm holes and nail holes.  To me, that's just another piece of history in our home.  


 The countertops are 1.5" thick.  See the old knot in the wood? 


There is also a backsplash.  I had not originally thought we would have one, but I love the additional warm wood in the white kitchen.  Do you see the nail holes at the top of the backsplash?


 I was worried that butcher block would be hard to maintain.  While I wasn't planning on using the surface for cutting, what if I damaged the surface?  How would it hold up with water?  I have been so pleased.  If you do have an imperfection, you simply sand the surface and reseal, but in the year I've had these (and I cook every day), I have not once had to sand out an imperfection.  While I am careful not to leave pools of water on the counter tops, they see dribbles of water, grease and other food ingredients every day.  

What product did I use to seal them?  I read about many different products and saw some wonderful reviews, but in the end I decided to use what my father-in-law recommended.  It's Behlen Salad Bowl Finish.  You can purchase it online; it is affordable and you will find it lasts a long time.  The instructions are provided on the product, but basically we sanded down the surface to a smooth finish and then applied a thin coat of the product with a lint-free white cloth.  We applied 3 coats initially, allowing the product to dry completely in between.  Every 4-6 months, I empty the countertops and reapply a coat. Once fully cured, salad bowl finish is completely food safe and non-toxic. It contains only FDA approved ingredients. 


To clean the countertops, I typically use a mild dish soap with water and then dry with a cloth.  I also keep a spray bottle with white vinegar and water handy and use this combination often to disinfect the surface.  

Now that I have had the countertops for a year and realize how durable they are, I am not nearly as cautious as I was in the beginning, but I do try to keep the surface as dry as possible.  


If you are researching countertops, I cannot recommend butcher block enough!  It is sturdy, easily maintained, natural, and even has anti-bacterial properties. The definition of "reclaimed" is to bring into or return to a suitable condition for use.  I love that something beautiful was made out of an old pile of barn wood - something to be made for many more years of use.

BEFORE:


AFTER:

Monday, February 13, 2012

A Valentine Owl Pillow


This year I wanted to do something special for our girls for Valentine's Day.  I've had my eye on some cute owl plushes from Pottery Barn Kids for a while... so they provided the inspiration for this project when I called up my mom and recruited her help to make some Valentine's Day themed owl pillows!  This was such a fun project and only took us about two hours (we each worked on one owl).  Although some basic sewing skills are needed, I am a novice, which means if I can do it, you can too!

SUPPLY LIST:

Items I purchased (for about $12) with plenty left over
  • 1 yard of fabric for the body
  • 1/4 yard each of two fabrics for embellishments and details
  • 1/4 yard of black flannel (or felt)
  • batting  
Items I had on hand
  •  white and pink felt
  • rick rack scraps
  • 1/4 yard of Wonder Under Fusible Web interfacing
  • scissors
  • paper for creating patterns
  • sewing machine, thread and pins

TUTORIAL:

1.  Decide what you want your owl to look like.  Then create a pattern for each owl part on a piece of paper, pin to the fabric and start cutting.  Be sure when cutting around your owl parts that you leave a seam allowance for sewing.  Also, you will want to cut two each of the body, feet and wings since they will be sewn together and stuffed.

NOTE: Before cutting, we attached fusible web interfacing to the wrong sides of the fabric for the eyes, nose and other fabric embellishments so that it was easier to machine applique in place.  If you've never used the fusible web interfacing before, refer to the instructions that come with the product.  You can purchase this by the yard at any fabric store.


2.  Once you have everything cut out, start assembling your owl.  Iron on eyes, nose and any embellishments.  Do a machine satin zig-zag stitch around these.


3.  Now you are ready to assemble your owl.  Sew the two pieces of feet fabric together, right sides together, leaving the back of the foot open.  Clip the seams open between the toes, turn right side out and stuff with batting.  Use pencil or sharp object to push out the fabric to give a sharp finish to the toes.  (It also helps if you can recruit an additional helper at this point... I recruited my husband to be our stuffer - smile.)  Set aside.


4.  Sew the leg fabric, right sides together, to create a tube.  Turn fabric to right side out, stuff and set aside.


5.  Sew the feet to the legs by placing one end of the stuffed tube inside the opening of the foot and then sew the opening closed.


6.  If you choose to have a two-part front body, like our example, sew the bottom to the top right sides together.  Open seam and iron flat.  Add and sew around any remaining embellishments (like the hearts in our example).


7.  Now you are ready to sew the owl body.  Pin front to back, right sides together and sew, leaving the bottom of the body open.  Turn right side out.  Be sure to use a pencil or sharp object to push out the fabric in the ears so that you end up with tight points.  Stuff the owl.

Sorry, I forgot to take a picture of this step...

8.  Take your legs and place the top of them inside the owl, equally spaced.  Pin both front and back of the opening together and sew closed, leaving very small opening between the legs.  Add more stuffing through this hole until the owl body is stuffed full and firm.  Sew that final opening closed.

  
We're finished!  A fun, inexpensive project... I can't wait to give these to our girls!

Happy Valentine's Day! 


Today I'm linking this project to a Dear Lillie Valentine's Link Party
    Copyright @ Keeping It Cozy. Blog Design by KotrynaBassDesign